搜索到
189
篇与
的结果
-
 RabbitMQ基本使用 RabbitMQ1.初识MQ1.1.同步和异步通讯微服务间通讯有同步和异步两种方式:同步通讯:就像打电话,需要实时响应。异步通讯:就像发邮件,不需要马上回复。两种方式各有优劣,打电话可以立即得到响应,但是你却不能跟多个人同时通话。发送邮件可以同时与多个人收发邮件,但是往往响应会有延迟。1.1.1.同步通讯我们之前学习的Feign调用就属于同步方式,虽然调用可以实时得到结果,但存在下面的问题:总结:同步调用的优点:时效性较强,可以立即得到结果同步调用的问题:耦合度高性能和吞吐能力下降有额外的资源消耗有级联失败问题1.1.2.异步通讯异步调用则可以避免上述问题:我们以购买商品为例,用户支付后需要调用订单服务完成订单状态修改,调用物流服务,从仓库分配响应的库存并准备发货。在事件模式中,支付服务是事件发布者(publisher),在支付完成后只需要发布一个支付成功的事件(event),事件中带上订单id。订单服务和物流服务是事件订阅者(Consumer),订阅支付成功的事件,监听到事件后完成自己业务即可。为了解除事件发布者与订阅者之间的耦合,两者并不是直接通信,而是有一个中间人(Broker)。发布者发布事件到Broker,不关心谁来订阅事件。订阅者从Broker订阅事件,不关心谁发来的消息。Broker 是一个像数据总线一样的东西,所有的服务要接收数据和发送数据都发到这个总线上,这个总线就像协议一样,让服务间的通讯变得标准和可控。好处:吞吐量提升:无需等待订阅者处理完成,响应更快速故障隔离:服务没有直接调用,不存在级联失败问题调用间没有阻塞,不会造成无效的资源占用耦合度极低,每个服务都可以灵活插拔,可替换流量削峰:不管发布事件的流量波动多大,都由Broker接收,订阅者可以按照自己的速度去处理事件缺点:架构复杂了,业务没有明显的流程线,不好管理需要依赖于Broker的可靠、安全、性能好在现在开源软件或云平台上 Broker 的软件是非常成熟的,比较常见的一种就是我们今天要学习的MQ技术。1.2.技术对比:MQ,中文是消息队列(MessageQueue),字面来看就是存放消息的队列。也就是事件驱动架构中的Broker。比较常见的MQ实现:ActiveMQRabbitMQRocketMQKafka几种常见MQ的对比: RabbitMQActiveMQRocketMQKafka公司/社区RabbitApache阿里Apache开发语言ErlangJavaJavaScala&Java协议支持AMQP,XMPP,SMTP,STOMPOpenWire,STOMP,REST,XMPP,AMQP自定义协议自定义协议可用性高一般高高单机吞吐量一般差高非常高消息延迟微秒级毫秒级毫秒级毫秒以内消息可靠性高一般高一般追求可用性:Kafka、 RocketMQ 、RabbitMQ追求可靠性:RabbitMQ、RocketMQ追求吞吐能力:RocketMQ、Kafka追求消息低延迟:RabbitMQ、Kafka2.快速入门2.1.安装RabbitMQ安装RabbitMQ,参考课前资料:MQ的基本结构:RabbitMQ中的一些角色:publisher:生产者consumer:消费者exchange个:交换机,负责消息路由queue:队列,存储消息virtualHost:虚拟主机,隔离不同租户的exchange、queue、消息的隔离2.2.RabbitMQ消息模型RabbitMQ官方提供了5个不同的Demo示例,对应了不同的消息模型:2.3.导入Demo工程课前资料提供了一个Demo工程,mq-demo:导入后可以看到结构如下:包括三部分:mq-demo:父工程,管理项目依赖publisher:消息的发送者consumer:消息的消费者2.4.入门案例简单队列模式的模型图:官方的HelloWorld是基于最基础的消息队列模型来实现的,只包括三个角色:publisher:消息发布者,将消息发送到队列queuequeue:消息队列,负责接受并缓存消息consumer:订阅队列,处理队列中的消息2.4.1.publisher实现思路:建立连接创建Channel声明队列发送消息关闭连接和channel代码实现:package cn.itcast.mq.helloworld; import com.rabbitmq.client.Channel; import com.rabbitmq.client.Connection; import com.rabbitmq.client.ConnectionFactory; import org.junit.Test; import java.io.IOException; import java.util.concurrent.TimeoutException; public class PublisherTest { @Test public void testSendMessage() throws IOException, TimeoutException { // 1.建立连接 ConnectionFactory factory = new ConnectionFactory(); // 1.1.设置连接参数,分别是:主机名、端口号、vhost、用户名、密码 factory.setHost("192.168.150.101"); factory.setPort(5672); factory.setVirtualHost("/"); factory.setUsername("itcast"); factory.setPassword("123321"); // 1.2.建立连接 Connection connection = factory.newConnection(); // 2.创建通道Channel Channel channel = connection.createChannel(); // 3.创建队列 String queueName = "simple.queue"; channel.queueDeclare(queueName, false, false, false, null); // 4.发送消息 String message = "hello, rabbitmq!"; channel.basicPublish("", queueName, null, message.getBytes()); System.out.println("发送消息成功:【" + message + "】"); // 5.关闭通道和连接 channel.close(); connection.close(); } }2.4.2.consumer实现代码思路:建立连接创建Channel声明队列订阅消息代码实现:package cn.itcast.mq.helloworld; import com.rabbitmq.client.*; import java.io.IOException; import java.util.concurrent.TimeoutException; public class ConsumerTest { public static void main(String[] args) throws IOException, TimeoutException { // 1.建立连接 ConnectionFactory factory = new ConnectionFactory(); // 1.1.设置连接参数,分别是:主机名、端口号、vhost、用户名、密码 factory.setHost("192.168.150.101"); factory.setPort(5672); factory.setVirtualHost("/"); factory.setUsername("itcast"); factory.setPassword("123321"); // 1.2.建立连接 Connection connection = factory.newConnection(); // 2.创建通道Channel Channel channel = connection.createChannel(); // 3.创建队列 String queueName = "simple.queue"; channel.queueDeclare(queueName, false, false, false, null); // 4.订阅消息 channel.basicConsume(queueName, true, new DefaultConsumer(channel){ @Override public void handleDelivery(String consumerTag, Envelope envelope, AMQP.BasicProperties properties, byte[] body) throws IOException { // 5.处理消息 String message = new String(body); System.out.println("接收到消息:【" + message + "】"); } }); System.out.println("等待接收消息。。。。"); } }2.5.总结基本消息队列的消息发送流程:建立connection创建channel利用channel声明队列利用channel向队列发送消息基本消息队列的消息接收流程:建立connection创建channel利用channel声明队列定义consumer的消费行为handleDelivery()利用channel将消费者与队列绑定3.SpringAMQPSpringAMQP是基于RabbitMQ封装的一套模板,并且还利用SpringBoot对其实现了自动装配,使用起来非常方便。SpringAmqp的官方地址:https://spring.io/projects/spring-amqpSpringAMQP提供了三个功能:自动声明队列、交换机及其绑定关系基于注解的监听器模式,异步接收消息封装了RabbitTemplate工具,用于发送消息3.1.Basic Queue 简单队列模型在父工程mq-demo中引入依赖<!--AMQP依赖,包含RabbitMQ--> <dependency> <groupId>org.springframework.boot</groupId> <artifactId>spring-boot-starter-amqp</artifactId> </dependency>3.1.1.消息发送首先配置MQ地址,在publisher服务的application.yml中添加配置:spring: rabbitmq: host: 192.168.150.101 # 主机名 port: 5672 # 端口 virtual-host: / # 虚拟主机 username: itcast # 用户名 password: 123321 # 密码然后在publisher服务中编写测试类SpringAmqpTest,并利用RabbitTemplate实现消息发送:package cn.itcast.mq.spring; import org.junit.Test; import org.junit.runner.RunWith; import org.springframework.amqp.rabbit.core.RabbitTemplate; import org.springframework.beans.factory.annotation.Autowired; import org.springframework.boot.test.context.SpringBootTest; import org.springframework.test.context.junit4.SpringRunner; @RunWith(SpringRunner.class) @SpringBootTest public class SpringAmqpTest { @Autowired private RabbitTemplate rabbitTemplate; @Test public void testSimpleQueue() { // 队列名称 String queueName = "simple.queue"; // 消息 String message = "hello, spring amqp!"; // 发送消息 rabbitTemplate.convertAndSend(queueName, message); } }3.1.2.消息接收首先配置MQ地址,在consumer服务的application.yml中添加配置:spring: rabbitmq: host: 192.168.150.101 # 主机名 port: 5672 # 端口 virtual-host: / # 虚拟主机 username: itcast # 用户名 password: 123321 # 密码然后在consumer服务的cn.itcast.mq.listener包中新建一个类SpringRabbitListener,代码如下:package cn.itcast.mq.listener; import org.springframework.amqp.rabbit.annotation.RabbitListener; import org.springframework.stereotype.Component; @Component public class SpringRabbitListener { @RabbitListener(queues = "simple.queue") public void listenSimpleQueueMessage(String msg) throws InterruptedException { System.out.println("spring 消费者接收到消息:【" + msg + "】"); } }3.1.3.测试启动consumer服务,然后在publisher服务中运行测试代码,发送MQ消息3.2.WorkQueueWork queues,也被称为(Task queues),任务模型。简单来说就是让多个消费者绑定到一个队列,共同消费队列中的消息。当消息处理比较耗时的时候,可能生产消息的速度会远远大于消息的消费速度。长此以往,消息就会堆积越来越多,无法及时处理。此时就可以使用work 模型,多个消费者共同处理消息处理,速度就能大大提高了。3.2.1.消息发送这次我们循环发送,模拟大量消息堆积现象。在publisher服务中的SpringAmqpTest类中添加一个测试方法:/** * workQueue * 向队列中不停发送消息,模拟消息堆积。 */ @Test public void testWorkQueue() throws InterruptedException { // 队列名称 String queueName = "simple.queue"; // 消息 String message = "hello, message_"; for (int i = 0; i < 50; i++) { // 发送消息 rabbitTemplate.convertAndSend(queueName, message + i); Thread.sleep(20); } }3.2.2.消息接收要模拟多个消费者绑定同一个队列,我们在consumer服务的SpringRabbitListener中添加2个新的方法:@RabbitListener(queues = "simple.queue") public void listenWorkQueue1(String msg) throws InterruptedException { System.out.println("消费者1接收到消息:【" + msg + "】" + LocalTime.now()); Thread.sleep(20); } @RabbitListener(queues = "simple.queue") public void listenWorkQueue2(String msg) throws InterruptedException { System.err.println("消费者2........接收到消息:【" + msg + "】" + LocalTime.now()); Thread.sleep(200); }注意到这个消费者sleep了1000秒,模拟任务耗时。3.2.3.测试启动ConsumerApplication后,在执行publisher服务中刚刚编写的发送测试方法testWorkQueue。可以看到消费者1很快完成了自己的25条消息。消费者2却在缓慢的处理自己的25条消息。也就是说消息是平均分配给每个消费者,并没有考虑到消费者的处理能力。这样显然是有问题的。3.2.4.能者多劳在spring中有一个简单的配置,可以解决这个问题。我们修改consumer服务的application.yml文件,添加配置:spring: rabbitmq: listener: simple: prefetch: 1 # 每次只能获取一条消息,处理完成才能获取下一个消息3.2.5.总结Work模型的使用:多个消费者绑定到一个队列,同一条消息只会被一个消费者处理通过设置prefetch来控制消费者预取的消息数量3.3.发布/订阅发布订阅的模型如图:可以看到,在订阅模型中,多了一个exchange角色,而且过程略有变化:Publisher:生产者,也就是要发送消息的程序,但是不再发送到队列中,而是发给X(交换机)Exchange:交换机,图中的X。一方面,接收生产者发送的消息。另一方面,知道如何处理消息,例如递交给某个特别队列、递交给所有队列、或是将消息丢弃。到底如何操作,取决于Exchange的类型。Exchange有以下3种类型:Fanout:广播,将消息交给所有绑定到交换机的队列Direct:定向,把消息交给符合指定routing key 的队列Topic:通配符,把消息交给符合routing pattern(路由模式) 的队列Consumer:消费者,与以前一样,订阅队列,没有变化Queue:消息队列也与以前一样,接收消息、缓存消息。Exchange(交换机)只负责转发消息,不具备存储消息的能力,因此如果没有任何队列与Exchange绑定,或者没有符合路由规则的队列,那么消息会丢失!3.4.FanoutFanout,英文翻译是扇出,我觉得在MQ中叫广播更合适。在广播模式下,消息发送流程是这样的:1) 可以有多个队列2) 每个队列都要绑定到Exchange(交换机)3) 生产者发送的消息,只能发送到交换机,交换机来决定要发给哪个队列,生产者无法决定4) 交换机把消息发送给绑定过的所有队列5) 订阅队列的消费者都能拿到消息我们的计划是这样的:创建一个交换机 itcast.fanout,类型是Fanout创建两个队列fanout.queue1和fanout.queue2,绑定到交换机itcast.fanout3.4.1.声明队列和交换机Spring提供了一个接口Exchange,来表示所有不同类型的交换机:在consumer中创建一个类,声明队列和交换机:package cn.itcast.mq.config; import org.springframework.amqp.core.Binding; import org.springframework.amqp.core.BindingBuilder; import org.springframework.amqp.core.FanoutExchange; import org.springframework.amqp.core.Queue; import org.springframework.context.annotation.Bean; import org.springframework.context.annotation.Configuration; @Configuration public class FanoutConfig { /** * 声明交换机 * @return Fanout类型交换机 */ @Bean public FanoutExchange fanoutExchange(){ return new FanoutExchange("itcast.fanout"); } /** * 第1个队列 */ @Bean public Queue fanoutQueue1(){ return new Queue("fanout.queue1"); } /** * 绑定队列和交换机 */ @Bean public Binding bindingQueue1(Queue fanoutQueue1, FanoutExchange fanoutExchange){ return BindingBuilder.bind(fanoutQueue1).to(fanoutExchange); } /** * 第2个队列 */ @Bean public Queue fanoutQueue2(){ return new Queue("fanout.queue2"); } /** * 绑定队列和交换机 */ @Bean public Binding bindingQueue2(Queue fanoutQueue2, FanoutExchange fanoutExchange){ return BindingBuilder.bind(fanoutQueue2).to(fanoutExchange); } }3.4.2.消息发送在publisher服务的SpringAmqpTest类中添加测试方法:@Test public void testFanoutExchange() { // 队列名称 String exchangeName = "itcast.fanout"; // 消息 String message = "hello, everyone!"; rabbitTemplate.convertAndSend(exchangeName, "", message); }3.4.3.消息接收在consumer服务的SpringRabbitListener中添加两个方法,作为消费者:@RabbitListener(queues = "fanout.queue1") public void listenFanoutQueue1(String msg) { System.out.println("消费者1接收到Fanout消息:【" + msg + "】"); } @RabbitListener(queues = "fanout.queue2") public void listenFanoutQueue2(String msg) { System.out.println("消费者2接收到Fanout消息:【" + msg + "】"); }3.4.4.总结交换机的作用是什么?接收publisher发送的消息将消息按照规则路由到与之绑定的队列不能缓存消息,路由失败,消息丢失FanoutExchange的会将消息路由到每个绑定的队列声明队列、交换机、绑定关系的Bean是什么?QueueFanoutExchangeBinding3.5.Direct在Fanout模式中,一条消息,会被所有订阅的队列都消费。但是,在某些场景下,我们希望不同的消息被不同的队列消费。这时就要用到Direct类型的Exchange。在Direct模型下:队列与交换机的绑定,不能是任意绑定了,而是要指定一个RoutingKey(路由key)消息的发送方在 向 Exchange发送消息时,也必须指定消息的 RoutingKey。Exchange不再把消息交给每一个绑定的队列,而是根据消息的Routing Key进行判断,只有队列的Routingkey与消息的 Routing key完全一致,才会接收到消息案例需求如下:利用@RabbitListener声明Exchange、Queue、RoutingKey在consumer服务中,编写两个消费者方法,分别监听direct.queue1和direct.queue2在publisher中编写测试方法,向itcast. direct发送消息3.5.1.基于注解声明队列和交换机基于@Bean的方式声明队列和交换机比较麻烦,Spring还提供了基于注解方式来声明。在consumer的SpringRabbitListener中添加两个消费者,同时基于注解来声明队列和交换机:@RabbitListener(bindings = @QueueBinding( value = @Queue(name = "direct.queue1"), exchange = @Exchange(name = "itcast.direct", type = ExchangeTypes.DIRECT), key = {"red", "blue"} )) public void listenDirectQueue1(String msg){ System.out.println("消费者接收到direct.queue1的消息:【" + msg + "】"); } @RabbitListener(bindings = @QueueBinding( value = @Queue(name = "direct.queue2"), exchange = @Exchange(name = "itcast.direct", type = ExchangeTypes.DIRECT), key = {"red", "yellow"} )) public void listenDirectQueue2(String msg){ System.out.println("消费者接收到direct.queue2的消息:【" + msg + "】"); }3.5.2.消息发送在publisher服务的SpringAmqpTest类中添加测试方法:@Test public void testSendDirectExchange() { // 交换机名称 String exchangeName = "itcast.direct"; // 消息 String message = "红色警报!日本乱排核废水,导致海洋生物变异,惊现哥斯拉!"; // 发送消息 rabbitTemplate.convertAndSend(exchangeName, "red", message); }3.5.3.总结描述下Direct交换机与Fanout交换机的差异?Fanout交换机将消息路由给每一个与之绑定的队列Direct交换机根据RoutingKey判断路由给哪个队列如果多个队列具有相同的RoutingKey,则与Fanout功能类似基于@RabbitListener注解声明队列和交换机有哪些常见注解?@Queue@Exchange3.6.Topic3.6.1.说明Topic类型的Exchange与Direct相比,都是可以根据RoutingKey把消息路由到不同的队列。只不过Topic类型Exchange可以让队列在绑定Routing key 的时候使用通配符!Routingkey 一般都是有一个或多个单词组成,多个单词之间以”.”分割,例如: item.insert通配符规则:#:匹配一个或多个词*:匹配不多不少恰好1个词举例:item.#:能够匹配item.spu.insert 或者 item.spuitem.*:只能匹配item.spu 图示:解释:Queue1:绑定的是china.# ,因此凡是以 china.开头的routing key 都会被匹配到。包括china.news和china.weatherQueue2:绑定的是#.news ,因此凡是以 .news结尾的 routing key 都会被匹配。包括china.news和japan.news案例需求:实现思路如下:并利用@RabbitListener声明Exchange、Queue、RoutingKey在consumer服务中,编写两个消费者方法,分别监听topic.queue1和topic.queue2在publisher中编写测试方法,向itcast. topic发送消息3.6.2.消息发送在publisher服务的SpringAmqpTest类中添加测试方法:/** * topicExchange */ @Test public void testSendTopicExchange() { // 交换机名称 String exchangeName = "itcast.topic"; // 消息 String message = "喜报!孙悟空大战哥斯拉,胜!"; // 发送消息 rabbitTemplate.convertAndSend(exchangeName, "china.news", message); }3.6.3.消息接收在consumer服务的SpringRabbitListener中添加方法:@RabbitListener(bindings = @QueueBinding( value = @Queue(name = "topic.queue1"), exchange = @Exchange(name = "itcast.topic", type = ExchangeTypes.TOPIC), key = "china.#" )) public void listenTopicQueue1(String msg){ System.out.println("消费者接收到topic.queue1的消息:【" + msg + "】"); } @RabbitListener(bindings = @QueueBinding( value = @Queue(name = "topic.queue2"), exchange = @Exchange(name = "itcast.topic", type = ExchangeTypes.TOPIC), key = "#.news" )) public void listenTopicQueue2(String msg){ System.out.println("消费者接收到topic.queue2的消息:【" + msg + "】"); }3.6.4.总结描述下Direct交换机与Topic交换机的差异?Topic交换机接收的消息RoutingKey必须是多个单词,以 **.** 分割Topic交换机与队列绑定时的bindingKey可以指定通配符#:代表0个或多个词*:代表1个词3.7.消息转换器之前说过,Spring会把你发送的消息序列化为字节发送给MQ,接收消息的时候,还会把字节反序列化为Java对象。只不过,默认情况下Spring采用的序列化方式是JDK序列化。众所周知,JDK序列化存在下列问题:数据体积过大有安全漏洞可读性差我们来测试一下。3.7.1.测试默认转换器我们修改消息发送的代码,发送一个Map对象:@Test public void testSendMap() throws InterruptedException { // 准备消息 Map<String,Object> msg = new HashMap<>(); msg.put("name", "Jack"); msg.put("age", 21); // 发送消息 rabbitTemplate.convertAndSend("simple.queue","", msg); }停止consumer服务发送消息后查看控制台:3.7.2.配置JSON转换器显然,JDK序列化方式并不合适。我们希望消息体的体积更小、可读性更高,因此可以使用JSON方式来做序列化和反序列化。在publisher和consumer两个服务中都引入依赖:<dependency> <groupId>com.fasterxml.jackson.dataformat</groupId> <artifactId>jackson-dataformat-xml</artifactId> <version>2.9.10</version> </dependency>配置消息转换器。在启动类中添加一个Bean即可:@Bean public MessageConverter jsonMessageConverter(){ return new Jackson2JsonMessageConverter(); }
 -
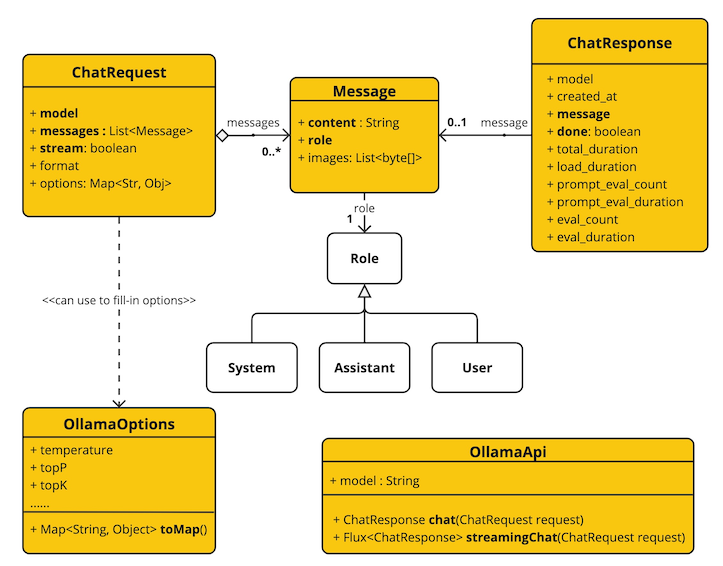
Spring AI来了 Spring AI来了Spring AI 项目旨在简化包含人工智能功能的应用程序的开发,避免不必要的复杂性。该项目从著名的 Python 项目(例如 LangChain 和 LlamaIndex)中汲取灵感,但 Spring AI 并不是这些项目的直接移植。 该项目的成立相信下一波生成式人工智能应用程序不仅适用于 Python 开发人员,而且将在许多编程语言中普遍存在。Spring AI 的核心提供了抽象,作为开发 AI 应用程序的基础。 这些抽象有多种实现,可以通过最少的代码更改轻松进行组件交换。一、Spring AI 提供以下功能Support for all major Model providers such as OpenAI, Microsoft, Amazon, Google, and Huggingface.(支持所有主要模型提供商,例如 OpenAI、Microsoft、Amazon、Google 和 Huggingface)Supported Model types are Chat and Text to Image with more on the way.(支持的模型类型包括“聊天”和“文本到图像”,还有更多模型类型正在开发中)Portable API across AI providers for Chat and for Embedding models. Both synchronous and stream API options are supported. Dropping down to access model specific features is also supported.(跨 AI 提供商的可移植 API,用于聊天和嵌入模型。 支持同步和流 API 选项。 还支持下拉访问模型特定功能)Mapping of AI Model output to POJOs.(AI 模型输出到 POJO 的映射)Support for all major Vector Database providers such as Azure Vector Search, Chroma, Milvus, Neo4j, PostgreSQL/PGVector, PineCone, Qdrant, Redis, and Weaviate(支持所有主要矢量数据库提供商,例如 Azure 矢量搜索、Chroma、Milvus、Neo4j、PostgreSQL/PGVector、PineCone、Qdrant、Redis 和 Weaviate)Portable API across Vector Store providers, including a novel SQL-like metadata filter API that is also portable.(跨 Vector Store 提供商的可移植 API,包括同样可移植的新颖的类似 SQL 的元数据过滤器 API)Function calling(函数调用)Spring Boot Auto Configuration and Starters for AI Models and Vector Stores.(AI 模型和向量存储的 Spring Boot 自动配置和启动器)ETL framework for Data Engineering(数据工程的 ETL 框架)二、俗语介绍ModelsModels模型是旨在处理和生成信息的算法,通常模仿人类的认知功能。 通过从大型数据集中学习模式和见解,这些模型可以做出预测、文本、图像或其他输出,从而增强跨行业的各种应用程序。有许多不同类型的人工智能模型,每种模型都适合特定的用例。 虽然 ChatGPT 及其生成式人工智能功能通过文本输入和输出吸引了用户,但许多模型和公司提供了多样化的输入和输出。 在 ChatGPT 之前,很多人对 Midjourney 和 Stable Diffusion 等文本到图像生成模型着迷。下表根据输入和输出类型对几种模型进行了分类:InputOutputExamplesLanguage/Code/Images (Multi-Modal)Language/CodeGPT4 - OpenAI, Google GeminiLanguage/CodeLanguage/CodeGPT 3.5 - OpenAI-Azure OpenAI, Google Bard, Meta LlamaLanguageImageDall-E - OpenAI + Azure, Deep AILanguage/ImageImageMidjourney, Stable Diffusion, RunwayMLTextNumbersMany (AKA embeddings)PromptsPrompts是基于语言的输入的基础,指导人工智能模型产生特定的输出。 对于熟悉 ChatGPT 的人来说,提示可能看起来只是发送到 API 的对话框中输入的文本。 然而,它包含的内容远不止于此。 在许多 AI 模型中,提示文本不仅仅是一个简单的字符串。ChatGPT 的 API 在Prompts中具有多个文本输入,每个文本输入都被分配一个角色。 例如,系统角色告诉模型如何行为并设置交互的上下文。 还有用户角色,通常是来自用户的输入。简单来说就是使用LLM等模型时,Prompts是输入,Prompts中输入内容被分配成不同的角色,每个角色控制不同的功能。Prompts的制定就成为重要的输入,可以共享,多人制定。Prompt Templates创建有效的提示涉及建立请求的上下文并用特定于用户输入的值替换部分请求。此过程使用传统的基于文本的模板引擎进行提示创建和管理。 Spring AI 为此使用 OSS 库 StringTemplate。Prompt Templates输入Prompts的模板,在Spring AI中,Prompt Templates可以比作Spring MVC架构中的“视图”。 提供模型对象(通常是 java.util.Map)来填充模板内的占位符。 “‘rendered’”字符串成为提供给 AI 模型的提示内容。EmbeddingsEmbeddings将文本转换为数值数组或向量,使人工智能模型能够处理和解释语言数据。 这种从文本到数字的转换是人工智能如何与人类语言交互并理解人类语言的关键要素。 作为探索人工智能的 Java 开发人员,没有必要理解复杂的数学理论或这些向量表示背后的具体实现。 对它们在人工智能系统中的角色和功能有基本的了解就足够了,特别是当您将人工智能功能集成到应用程序中时。嵌入在实际应用中尤其重要,例如检索增强生成(RAG)模式。 它们能够将数据表示为语义空间中的点,该语义空间类似于欧几里得几何的二维空间,但维度更高。 这意味着就像欧几里得几何中平面上的点根据其坐标可以接近或远离一样,在语义空间中,点的接近反映了含义的相似性。 关于相似主题的句子在这个多维空间中位置更近,就像图表上彼此靠近的点一样。 这种接近性有助于文本分类、语义搜索甚至产品推荐等任务,因为它允许人工智能根据相关概念在扩展语义环境中的“位置”来辨别和分组。您可以将这个语义空间视为一个向量。Output ParsingAI 模型的输出传统上以 java.lang.String 形式到达,即使您要求回复采用 JSON 格式。 它可能是正确的 JSON,但它不是 JSON 数据结构。 它只是一个字符串。 此外,在提示中询问“for JSON”并不是 100% 准确。这种复杂性导致了一个专门领域的出现,涉及创建提示以产生预期的输出,然后将生成的简单字符串解析为可用的数据结构以进行应用程序集成。输出解析采用精心设计的提示,通常需要与模型进行多次交互才能实现所需的格式。这一挑战促使 OpenAI 引入“OpenAI 函数”作为精确指定模型所需输出格式的方法。三、Bringing Your Data to the AI model(将您的数据引入人工智能模型)存在三种技术可用于自定义 AI 模型以合并您的数据:微调:这种传统的机器学习技术涉及定制模型并更改其内部权重。 然而,对于机器学习专家来说,这是一个具有挑战性的过程,而且对于 GPT 等模型来说,由于其规模,资源极其密集。 此外,某些型号可能不提供此选项。提示填充:更实用的替代方案是将数据嵌入到提供给模型的提示中。 考虑到模型的令牌限制,需要技术来在模型的上下文窗口中呈现相关数据。 这种方法通俗地称为“填充提示”。 Spring AI 库可帮助您实现基于“填充提示”技术(也称为检索增强生成 (RAG))的解决方案。函数调用:此技术允许注册自定义用户函数,将大型语言模型连接到外部系统的 API。 Spring AI 极大地简化了支持函数调用所需编写的代码。四、其它说明Retrieval Augmented Generation一种名为检索增强生成 (RAG) 的技术已经出现,旨在解决将相关数据纳入提示中以实现准确的 AI 模型响应的挑战。该方法涉及批处理风格的编程模型,其中作业从文档中读取非结构化数据,对其进行转换,然后将其写入矢量数据库。 从较高层面来看,这是一个 ETL(提取、转换和加载)管道。 RAG技术的检索部分使用向量数据库。作为将非结构化数据加载到矢量数据库的一部分,最重要的转换之一是将原始文档分割成更小的部分。 将原始文档分割成更小的部分的过程有两个重要步骤:将文档拆分为多个部分,同时保留内容的语义边界。 例如,对于包含段落和表格的文档,应避免在段落或表格的中间拆分文档。 对于代码,避免在方法实现的中间拆分代码。将文档的各个部分进一步拆分为大小仅为 AI 模型令牌限制的一小部分的部分。RAG 的下一阶段是处理用户输入。 当人工智能模型要回答用户的问题时,该问题和所有“相似”文档片段都会被放入发送给人工智能模型的提示中。 这就是使用矢量数据库的原因。 它非常擅长查找相似内容。实现 RAG 时使用了几个概念。 这些概念映射到 Spring AI 中的类:DocumentReader:一个 Java 函数接口,负责从数据源加载 List。 常见的数据源有 PDF、Markdown 和 JSON。Document:数据源的基于文本的表示形式,还包含用于描述内容的元数据。DocumentTransformer:负责以各种方式处理数据(例如,将文档分割成更小的部分或向文档添加额外的元数据)。DocumentWriter:允许您将文档保存到数据库中(最常见的是在 AI 堆栈中,矢量数据库)。Embedding:将数据表示为 List,向量数据库使用它来计算用户查询与相关文档的“相似度”。Function Calling大型语言模型(LLM)在训练后被冻结,导致知识过时,并且无法访问或修改外部数据。函数调用机制解决了这些缺点。 它允许您注册自定义用户函数,将大型语言模型连接到外部系统的 API。 这些系统可以为法学硕士提供实时数据并代表他们执行数据处理操作。Spring AI 极大地简化了支持函数调用所需编写的代码。 它为您代理函数调用对话。 您可以将函数作为 @Bean 提供,然后在提示选项中提供该函数的 bean 名称以激活该函数。 您还可以在单个提示中定义和引用多个函数。Evaluating AI responses有效评估人工智能系统响应用户请求的输出对于确保最终应用的准确性和有用性非常重要。 一些新兴技术可以使用预训练模型本身来实现此目的。此评估过程涉及分析生成的响应是否符合用户的意图和查询的上下文。 相关性、连贯性和事实正确性等指标用于衡量人工智能生成的响应的质量。一种方法涉及呈现用户的请求和人工智能模型对模型的响应,查询响应是否与提供的数据一致。此外,利用矢量数据库中存储的信息作为补充数据可以增强评估过程,有助于确定响应相关性。Spring AI 项目当前提供了一些非常基本的示例,说明如何以提示的形式评估响应以包含在 JUnit 测试中。五、功能说明Embeddings ModelsEmbeddings APISpring AI OpenAI EmbeddingsSpring AI Azure OpenAI EmbeddingsSpring AI Ollama EmbeddingsSpring AI Transformers (ONNX) EmbeddingsSpring AI PostgresML EmbeddingsSpring AI Bedrock Cohere EmbeddingsSpring AI Bedrock Titan EmbeddingsSpring AI VertexAI EmbeddingsSpring AI MistralAI EmbeddingsChat ModelsChat Completion APIOpenAI Chat Completion (streaming and function-calling support)Microsoft Azure Open AI Chat Completion (streaming and function-calling support)Ollama Chat CompletionHuggingFace Chat Completion (no streaming support)Google Vertex AI PaLM2 Chat Completion (no streaming support)Google Vertex AI Gemini Chat Completion (streaming, multi-modality & function-calling support)Amazon BedrockCohere Chat CompletionLlama2 Chat CompletionTitan Chat CompletionAnthropic Chat CompletionMistralAI Chat Completion (streaming and function-calling support)Image Generation ModelsImage Generation APIOpenAI Image GenerationStabilityAI Image GenerationVector DatabasesVector Database APIAzure Vector Search - The Azure vector store.ChromaVectorStore - The Chroma vector store.MilvusVectorStore - The Milvus vector store.Neo4jVectorStore - The Neo4j vector store.PgVectorStore - The PostgreSQL/PGVector vector store.PineconeVectorStore - PineCone vector store.QdrantVectorStore - Qdrant vector store.RedisVectorStore - The Redis vector store.WeaviateVectorStore - The Weaviate vector store.SimpleVectorStore - A simple (in-memory) implementation of persistent vector storage, good for educational purposes.六、springboot ai接入Ollama Chat这里以Chat Models为例,创建一个springboot ai项目。说明:由于Openai api key收费,这里以Ollama Chat为LLM演示。本地搭建Ollama Chat下载Ollama https://ollama.com/download/OllamaSetup.exe拉取运行ollama run llama2如果想支持中文拉取这个ollama pull llama2-chinese执行ollama run llama2-chineseollama默认服务地址端口http://localhost:11434/搭建springboot ai项目说明:对JDK有版本要求,最低JDK17.maven:3.8.3JDK:172、引入依赖<?xml version="1.0" encoding="UTF-8"?> <project xmlns="http://maven.apache.org/POM/4.0.0" xmlns:xsi="http://www.w3.org/2001/XMLSchema-instance" xsi:schemaLocation="http://maven.apache.org/POM/4.0.0 https://maven.apache.org/xsd/maven-4.0.0.xsd"> <modelVersion>4.0.0</modelVersion> <parent> <groupId>org.springframework.boot</groupId> <artifactId>spring-boot-starter-parent</artifactId> <version>3.2.4</version> <relativePath/> <!-- lookup parent from repository --> </parent> <groupId>com.example.ai</groupId> <artifactId>ollama-chat</artifactId> <version>0.0.1-SNAPSHOT</version> <name>ollama-chat</name> <description>Ollama Chat project for Spring Boot</description> <properties> <java.version>17</java.version> </properties> <dependencies> <dependency> <groupId>org.springframework.boot</groupId> <artifactId>spring-boot-starter-web</artifactId> </dependency> <dependency> <groupId>org.springframework.boot</groupId> <artifactId>spring-boot-starter-test</artifactId> <scope>test</scope> </dependency> <dependency> <groupId>org.springframework.ai</groupId> <artifactId>spring-ai-ollama-spring-boot-starter</artifactId> </dependency> </dependencies> <build> <plugins> <plugin> <groupId>org.springframework.boot</groupId> <artifactId>spring-boot-maven-plugin</artifactId> </plugin> </plugins> </build> <repositories> <repository> <id>spring-milestones</id> <name>Spring Milestones</name> <url>https://repo.spring.io/milestone</url> <snapshots> <enabled>false</enabled> </snapshots> </repository> <repository> <id>spring-snapshots</id> <name>Spring Snapshots</name> <url>https://repo.spring.io/snapshot</url> <releases> <enabled>false</enabled> </releases> </repository> </repositories> <dependencyManagement> <dependencies> <dependency> <groupId>org.springframework.ai</groupId> <artifactId>spring-ai-bom</artifactId> <version>1.0.0-SNAPSHOT</version> <type>pom</type> <scope>import</scope> </dependency> </dependencies> </dependencyManagement> </project> 编写Controllerpackage com.example.ai.ollamachat.controller; import org.springframework.ai.chat.ChatResponse; import org.springframework.ai.chat.messages.UserMessage; import org.springframework.ai.chat.prompt.Prompt; import org.springframework.ai.ollama.OllamaChatClient; import org.springframework.beans.factory.annotation.Autowired; import org.springframework.web.bind.annotation.GetMapping; import org.springframework.web.bind.annotation.RequestParam; import org.springframework.web.bind.annotation.RestController; import reactor.core.publisher.Flux; import java.util.Map; @RestController public class ChatController { private final OllamaChatClient chatClient; @Autowired public ChatController(OllamaChatClient chatClient) { this.chatClient = chatClient; } @GetMapping("/ai/generate") public Map generate(@RequestParam(value = "message", defaultValue = "Tell me a joke") String message) { return Map.of("generation", chatClient.call(message)); } @GetMapping("/ai/generateStream") public Flux<ChatResponse> generateStream(@RequestParam(value = "message", defaultValue = "Tell me a joke") String message) { Prompt prompt = new Prompt(new UserMessage(message)); return chatClient.stream(prompt); } }application.properties配置spring.application.name=ollama-chat spring.ai.ollama.base-url=http://localhost:11434/ spring.ai.ollama.chat.enabled=true spring.ai.ollama.chat.options.model=llama2 spring.ai.ollama.chat.options.temperature=0.7更多参数配置见文档 https://docs.spring.io/spring-ai/reference/api/clients/ollama-chat.html测试访问http://localhost:8080/ai/generate返回结果{"generation":"\nWhy don't scientists trust atoms? Because they make up everything! \uD83D\uDE02"}说明OllamaApi 聊天接口和构建块图:更多其它LLM接入,后续更新。
-
Nacos配置管理、Feign远程调用、Gateway网关 SpringCloud实用篇020.学习目标1.Nacos配置管理Nacos除了可以做注册中心,同样可以做配置管理来使用。1.1.统一配置管理当微服务部署的实例越来越多,达到数十、数百时,逐个修改微服务配置就会让人抓狂,而且很容易出错。我们需要一种统一配置管理方案,可以集中管理所有实例的配置。Nacos一方面可以将配置集中管理,另一方可以在配置变更时,及时通知微服务,实现配置的热更新。1.1.1.在nacos中添加配置文件如何在nacos中管理配置呢?然后在弹出的表单中,填写配置信息:注意:项目的核心配置,需要热更新的配置才有放到nacos管理的必要。基本不会变更的一些配置还是保存在微服务本地比较好。1.1.2.从微服务拉取配置微服务要拉取nacos中管理的配置,并且与本地的application.yml配置合并,才能完成项目启动。但如果尚未读取application.yml,又如何得知nacos地址呢?因此spring引入了一种新的配置文件:bootstrap.yaml文件,会在application.yml之前被读取,流程如下:1)引入nacos-config依赖首先,在user-service服务中,引入nacos-config的客户端依赖:<!--nacos配置管理依赖--> <dependency> <groupId>com.alibaba.cloud</groupId> <artifactId>spring-cloud-starter-alibaba-nacos-config</artifactId> </dependency>2)添加bootstrap.yaml然后,在user-service中添加一个bootstrap.yaml文件,内容如下:spring: application: name: userservice # 服务名称 profiles: active: dev #开发环境,这里是dev cloud: nacos: server-addr: localhost:8848 # Nacos地址 config: file-extension: yaml # 文件后缀名这里会根据spring.cloud.nacos.server-addr获取nacos地址,再根据${spring.application.name}-${spring.profiles.active}.${spring.cloud.nacos.config.file-extension}作为文件id,来读取配置。本例中,就是去读取userservice-dev.yaml:3)读取nacos配置在user-service中的UserController中添加业务逻辑,读取pattern.dateformat配置:完整代码:package cn.itcast.user.web; import cn.itcast.user.pojo.User; import cn.itcast.user.service.UserService; import lombok.extern.slf4j.Slf4j; import org.springframework.beans.factory.annotation.Autowired; import org.springframework.beans.factory.annotation.Value; import org.springframework.web.bind.annotation.*; import java.time.LocalDateTime; import java.time.format.DateTimeFormatter; @Slf4j @RestController @RequestMapping("/user") public class UserController { @Autowired private UserService userService; @Value("${pattern.dateformat}") private String dateformat; @GetMapping("now") public String now(){ return LocalDateTime.now().format(DateTimeFormatter.ofPattern(dateformat)); } // ...略 }在页面访问,可以看到效果:1.2.配置热更新我们最终的目的,是修改nacos中的配置后,微服务中无需重启即可让配置生效,也就是配置热更新。要实现配置热更新,可以使用两种方式:1.2.1.方式一在@Value注入的变量所在类上添加注解@RefreshScope:1.2.2.方式二使用@ConfigurationProperties注解代替@Value注解。在user-service服务中,添加一个类,读取patterrn.dateformat属性:package cn.itcast.user.config; import lombok.Data; import org.springframework.boot.context.properties.ConfigurationProperties; import org.springframework.stereotype.Component; @Component @Data @ConfigurationProperties(prefix = "pattern") public class PatternProperties { private String dateformat; }在UserController中使用这个类代替@Value:完整代码:package cn.itcast.user.web; import cn.itcast.user.config.PatternProperties; import cn.itcast.user.pojo.User; import cn.itcast.user.service.UserService; import lombok.extern.slf4j.Slf4j; import org.springframework.beans.factory.annotation.Autowired; import org.springframework.web.bind.annotation.GetMapping; import org.springframework.web.bind.annotation.PathVariable; import org.springframework.web.bind.annotation.RequestMapping; import org.springframework.web.bind.annotation.RestController; import java.time.LocalDateTime; import java.time.format.DateTimeFormatter; @Slf4j @RestController @RequestMapping("/user") public class UserController { @Autowired private UserService userService; @Autowired private PatternProperties patternProperties; @GetMapping("now") public String now(){ return LocalDateTime.now().format(DateTimeFormatter.ofPattern(patternProperties.getDateformat())); } // 略 }1.3.配置共享其实微服务启动时,会去nacos读取多个配置文件,例如:[spring.application.name]-[spring.profiles.active].yaml,例如:userservice-dev.yaml[spring.application.name].yaml,例如:userservice.yaml而[spring.application.name].yaml不包含环境,因此可以被多个环境共享。下面我们通过案例来测试配置共享1)添加一个环境共享配置我们在nacos中添加一个userservice.yaml文件:2)在user-service中读取共享配置在user-service服务中,修改PatternProperties类,读取新添加的属性:在user-service服务中,修改UserController,添加一个方法:3)运行两个UserApplication,使用不同的profile修改UserApplication2这个启动项,改变其profile值:这样,UserApplication(8081)使用的profile是dev,UserApplication2(8082)使用的profile是test。启动UserApplication和UserApplication2访问http://localhost:8081/user/prop,结果:访问http://localhost:8082/user/prop,结果:可以看出来,不管是dev,还是test环境,都读取到了envSharedValue这个属性的值。4)配置共享的优先级当nacos、服务本地同时出现相同属性时,优先级有高低之分:1.4.搭建Nacos集群Nacos生产环境下一定要部署为集群状态,部署方式参考课前资料中的文档:2.Feign远程调用先来看我们以前利用RestTemplate发起远程调用的代码:存在下面的问题:•代码可读性差,编程体验不统一•参数复杂URL难以维护Feign是一个声明式的http客户端,官方地址:https://github.com/OpenFeign/feign其作用就是帮助我们优雅的实现http请求的发送,解决上面提到的问题。2.1.Feign替代RestTemplateFegin的使用步骤如下:1)引入依赖我们在order-service服务的pom文件中引入feign的依赖:<dependency> <groupId>org.springframework.cloud</groupId> <artifactId>spring-cloud-starter-openfeign</artifactId> </dependency>2)添加注解在order-service的启动类添加注解开启Feign的功能:3)编写Feign的客户端在order-service中新建一个接口,内容如下:package cn.itcast.order.client; import cn.itcast.order.pojo.User; import org.springframework.cloud.openfeign.FeignClient; import org.springframework.web.bind.annotation.GetMapping; import org.springframework.web.bind.annotation.PathVariable; @FeignClient("userservice") public interface UserClient { @GetMapping("/user/{id}") User findById(@PathVariable("id") Long id); }这个客户端主要是基于SpringMVC的注解来声明远程调用的信息,比如:服务名称:userservice请求方式:GET请求路径:/user/{id}请求参数:Long id返回值类型:User这样,Feign就可以帮助我们发送http请求,无需自己使用RestTemplate来发送了。4)测试修改order-service中的OrderService类中的queryOrderById方法,使用Feign客户端代替RestTemplate:是不是看起来优雅多了。5)总结使用Feign的步骤:① 引入依赖② 添加@EnableFeignClients注解③ 编写FeignClient接口④ 使用FeignClient中定义的方法代替RestTemplate2.2.自定义配置Feign可以支持很多的自定义配置,如下表所示:类型作用说明feign.Logger.Level修改日志级别包含四种不同的级别:NONE、BASIC、HEADERS、FULLfeign.codec.Decoder响应结果的解析器http远程调用的结果做解析,例如解析json字符串为java对象feign.codec.Encoder请求参数编码将请求参数编码,便于通过http请求发送feign. Contract支持的注解格式默认是SpringMVC的注解feign. Retryer失败重试机制请求失败的重试机制,默认是没有,不过会使用Ribbon的重试一般情况下,默认值就能满足我们使用,如果要自定义时,只需要创建自定义的@Bean覆盖默认Bean即可。下面以日志为例来演示如何自定义配置。2.2.1.配置文件方式基于配置文件修改feign的日志级别可以针对单个服务:feign: client: config: userservice: # 针对某个微服务的配置 loggerLevel: FULL # 日志级别 也可以针对所有服务:feign: client: config: default: # 这里用default就是全局配置,如果是写服务名称,则是针对某个微服务的配置 loggerLevel: FULL # 日志级别 而日志的级别分为四种:NONE:不记录任何日志信息,这是默认值。BASIC:仅记录请求的方法,URL以及响应状态码和执行时间HEADERS:在BASIC的基础上,额外记录了请求和响应的头信息FULL:记录所有请求和响应的明细,包括头信息、请求体、元数据。2.2.2.Java代码方式也可以基于Java代码来修改日志级别,先声明一个类,然后声明一个Logger.Level的对象:public class DefaultFeignConfiguration { @Bean public Logger.Level feignLogLevel(){ return Logger.Level.BASIC; // 日志级别为BASIC } }如果要全局生效,将其放到启动类的@EnableFeignClients这个注解中:@EnableFeignClients(defaultConfiguration = DefaultFeignConfiguration .class) 如果是局部生效,则把它放到对应的@FeignClient这个注解中:@FeignClient(value = "userservice", configuration = DefaultFeignConfiguration .class) 2.3.Feign使用优化Feign底层发起http请求,依赖于其它的框架。其底层客户端实现包括:•URLConnection:默认实现,不支持连接池•Apache HttpClient :支持连接池•OKHttp:支持连接池因此提高Feign的性能主要手段就是使用连接池代替默认的URLConnection。这里我们用Apache的HttpClient来演示。1)引入依赖在order-service的pom文件中引入Apache的HttpClient依赖:<!--httpClient的依赖 --> <dependency> <groupId>io.github.openfeign</groupId> <artifactId>feign-httpclient</artifactId> </dependency>2)配置连接池在order-service的application.yml中添加配置:feign: client: config: default: # default全局的配置 loggerLevel: BASIC # 日志级别,BASIC就是基本的请求和响应信息 httpclient: enabled: true # 开启feign对HttpClient的支持 max-connections: 200 # 最大的连接数 max-connections-per-route: 50 # 每个路径的最大连接数接下来,在FeignClientFactoryBean中的loadBalance方法中打断点:Debug方式启动order-service服务,可以看到这里的client,底层就是Apache HttpClient:总结,Feign的优化:1.日志级别尽量用basic2.使用HttpClient或OKHttp代替URLConnection① 引入feign-httpClient依赖② 配置文件开启httpClient功能,设置连接池参数2.4.最佳实践所谓最近实践,就是使用过程中总结的经验,最好的一种使用方式。自习观察可以发现,Feign的客户端与服务提供者的controller代码非常相似:feign客户端:UserController:有没有一种办法简化这种重复的代码编写呢?2.4.1.继承方式一样的代码可以通过继承来共享:1)定义一个API接口,利用定义方法,并基于SpringMVC注解做声明。2)Feign客户端和Controller都集成改接口优点:简单实现了代码共享缺点:服务提供方、服务消费方紧耦合参数列表中的注解映射并不会继承,因此Controller中必须再次声明方法、参数列表、注解2.4.2.抽取方式将Feign的Client抽取为独立模块,并且把接口有关的POJO、默认的Feign配置都放到这个模块中,提供给所有消费者使用。例如,将UserClient、User、Feign的默认配置都抽取到一个feign-api包中,所有微服务引用该依赖包,即可直接使用。2.4.3.实现基于抽取的最佳实践1)抽取首先创建一个module,命名为feign-api:项目结构:在feign-api中然后引入feign的starter依赖<dependency> <groupId>org.springframework.cloud</groupId> <artifactId>spring-cloud-starter-openfeign</artifactId> </dependency>然后,order-service中编写的UserClient、User、DefaultFeignConfiguration都复制到feign-api项目中2)在order-service中使用feign-api首先,删除order-service中的UserClient、User、DefaultFeignConfiguration等类或接口。在order-service的pom文件中中引入feign-api的依赖:<dependency> <groupId>cn.itcast.demo</groupId> <artifactId>feign-api</artifactId> <version>1.0</version> </dependency>修改order-service中的所有与上述三个组件有关的导包部分,改成导入feign-api中的包3)重启测试重启后,发现服务报错了:这是因为UserClient现在在cn.itcast.feign.clients包下,而order-service的@EnableFeignClients注解是在cn.itcast.order包下,不在同一个包,无法扫描到UserClient。4)解决扫描包问题方式一:指定Feign应该扫描的包:@EnableFeignClients(basePackages = "cn.itcast.feign.clients")方式二:指定需要加载的Client接口:@EnableFeignClients(clients = {UserClient.class})3.Gateway服务网关Spring Cloud Gateway 是 Spring Cloud 的一个全新项目,该项目是基于 Spring 5.0,Spring Boot 2.0 和 Project Reactor 等响应式编程和事件流技术开发的网关,它旨在为微服务架构提供一种简单有效的统一的 API 路由管理方式。3.1.为什么需要网关Gateway网关是我们服务的守门神,所有微服务的统一入口。网关的核心功能特性:请求路由权限控制限流架构图:权限控制:网关作为微服务入口,需要校验用户是是否有请求资格,如果没有则进行拦截。路由和负载均衡:一切请求都必须先经过gateway,但网关不处理业务,而是根据某种规则,把请求转发到某个微服务,这个过程叫做路由。当然路由的目标服务有多个时,还需要做负载均衡。限流:当请求流量过高时,在网关中按照下流的微服务能够接受的速度来放行请求,避免服务压力过大。在SpringCloud中网关的实现包括两种:gatewayzuulZuul是基于Servlet的实现,属于阻塞式编程。而SpringCloudGateway则是基于Spring5中提供的WebFlux,属于响应式编程的实现,具备更好的性能。3.2.gateway快速入门下面,我们就演示下网关的基本路由功能。基本步骤如下:创建SpringBoot工程gateway,引入网关依赖编写启动类编写基础配置和路由规则启动网关服务进行测试1)创建gateway服务,引入依赖创建服务:引入依赖:<!--网关--> <dependency> <groupId>org.springframework.cloud</groupId> <artifactId>spring-cloud-starter-gateway</artifactId> </dependency> <!--nacos服务发现依赖--> <dependency> <groupId>com.alibaba.cloud</groupId> <artifactId>spring-cloud-starter-alibaba-nacos-discovery</artifactId> </dependency>2)编写启动类package cn.itcast.gateway; import org.springframework.boot.SpringApplication; import org.springframework.boot.autoconfigure.SpringBootApplication; @SpringBootApplication public class GatewayApplication { public static void main(String[] args) { SpringApplication.run(GatewayApplication.class, args); } }3)编写基础配置和路由规则创建application.yml文件,内容如下:server: port: 10010 # 网关端口 spring: application: name: gateway # 服务名称 cloud: nacos: server-addr: localhost:8848 # nacos地址 gateway: routes: # 网关路由配置 - id: user-service # 路由id,自定义,只要唯一即可 # uri: http://127.0.0.1:8081 # 路由的目标地址 http就是固定地址 uri: lb://userservice # 路由的目标地址 lb就是负载均衡,后面跟服务名称 predicates: # 路由断言,也就是判断请求是否符合路由规则的条件 - Path=/user/** # 这个是按照路径匹配,只要以/user/开头就符合要求我们将符合Path 规则的一切请求,都代理到 uri参数指定的地址。本例中,我们将 /user/**开头的请求,代理到lb://userservice,lb是负载均衡,根据服务名拉取服务列表,实现负载均衡。4)重启测试重启网关,访问http://localhost:10010/user/1时,符合/user/**规则,请求转发到uri:http://userservice/user/1,得到了结果:5)网关路由的流程图整个访问的流程如下:总结:网关搭建步骤:创建项目,引入nacos服务发现和gateway依赖配置application.yml,包括服务基本信息、nacos地址、路由路由配置包括:路由id:路由的唯一标示路由目标(uri):路由的目标地址,http代表固定地址,lb代表根据服务名负载均衡路由断言(predicates):判断路由的规则,路由过滤器(filters):对请求或响应做处理接下来,就重点来学习路由断言和路由过滤器的详细知识3.3.断言工厂我们在配置文件中写的断言规则只是字符串,这些字符串会被Predicate Factory读取并处理,转变为路由判断的条件例如Path=/user/**是按照路径匹配,这个规则是由org.springframework.cloud.gateway.handler.predicate.PathRoutePredicateFactory类来处理的,像这样的断言工厂在SpringCloudGateway还有十几个:名称说明示例After是某个时间点后的请求- After=2037-01-20T17:42:47.789-07:00[America/Denver]Before是某个时间点之前的请求- Before=2031-04-13T15:14:47.433+08:00[Asia/Shanghai]Between是某两个时间点之前的请求- Between=2037-01-20T17:42:47.789-07:00[America/Denver], 2037-01-21T17:42:47.789-07:00[America/Denver]Cookie请求必须包含某些cookie- Cookie=chocolate, ch.pHeader请求必须包含某些header- Header=X-Request-Id, \d+Host请求必须是访问某个host(域名)- Host=.somehost.org,.anotherhost.orgMethod请求方式必须是指定方式- Method=GET,POSTPath请求路径必须符合指定规则- Path=/red/{segment},/blue/**Query请求参数必须包含指定参数- Query=name, Jack或者- Query=nameRemoteAddr请求者的ip必须是指定范围- RemoteAddr=192.168.1.1/24Weight权重处理 我们只需要掌握Path这种路由工程就可以了。3.4.过滤器工厂GatewayFilter是网关中提供的一种过滤器,可以对进入网关的请求和微服务返回的响应做处理:3.4.1.路由过滤器的种类Spring提供了31种不同的路由过滤器工厂。例如:名称说明AddRequestHeader给当前请求添加一个请求头RemoveRequestHeader移除请求中的一个请求头AddResponseHeader给响应结果中添加一个响应头RemoveResponseHeader从响应结果中移除有一个响应头RequestRateLimiter限制请求的流量3.4.2.请求头过滤器下面我们以AddRequestHeader 为例来讲解。需求:给所有进入userservice的请求添加一个请求头:Truth=itcast is freaking awesome!只需要修改gateway服务的application.yml文件,添加路由过滤即可:spring: cloud: gateway: routes: - id: user-service uri: lb://userservice predicates: - Path=/user/** filters: # 过滤器 - AddRequestHeader=Truth, Itcast is freaking awesome! # 添加请求头当前过滤器写在userservice路由下,因此仅仅对访问userservice的请求有效。3.4.3.默认过滤器如果要对所有的路由都生效,则可以将过滤器工厂写到default下。格式如下:spring: cloud: gateway: routes: - id: user-service uri: lb://userservice predicates: - Path=/user/** default-filters: # 默认过滤项 - AddRequestHeader=Truth, Itcast is freaking awesome! 3.4.4.总结过滤器的作用是什么?① 对路由的请求或响应做加工处理,比如添加请求头② 配置在路由下的过滤器只对当前路由的请求生效defaultFilters的作用是什么?① 对所有路由都生效的过滤器3.5.全局过滤器上一节学习的过滤器,网关提供了31种,但每一种过滤器的作用都是固定的。如果我们希望拦截请求,做自己的业务逻辑则没办法实现。3.5.1.全局过滤器作用全局过滤器的作用也是处理一切进入网关的请求和微服务响应,与GatewayFilter的作用一样。区别在于GatewayFilter通过配置定义,处理逻辑是固定的;而GlobalFilter的逻辑需要自己写代码实现。定义方式是实现GlobalFilter接口。public interface GlobalFilter { /** * 处理当前请求,有必要的话通过{@link GatewayFilterChain}将请求交给下一个过滤器处理 * * @param exchange 请求上下文,里面可以获取Request、Response等信息 * @param chain 用来把请求委托给下一个过滤器 * @return {@code Mono<Void>} 返回标示当前过滤器业务结束 */ Mono<Void> filter(ServerWebExchange exchange, GatewayFilterChain chain); }在filter中编写自定义逻辑,可以实现下列功能:登录状态判断权限校验请求限流等3.5.2.自定义全局过滤器需求:定义全局过滤器,拦截请求,判断请求的参数是否满足下面条件:参数中是否有authorization,authorization参数值是否为admin如果同时满足则放行,否则拦截实现:在gateway中定义一个过滤器:package cn.itcast.gateway.filters; import org.springframework.cloud.gateway.filter.GatewayFilterChain; import org.springframework.cloud.gateway.filter.GlobalFilter; import org.springframework.core.annotation.Order; import org.springframework.http.HttpStatus; import org.springframework.stereotype.Component; import org.springframework.web.server.ServerWebExchange; import reactor.core.publisher.Mono; @Order(-1) @Component public class AuthorizeFilter implements GlobalFilter { @Override public Mono<Void> filter(ServerWebExchange exchange, GatewayFilterChain chain) { // 1.获取请求参数 MultiValueMap<String, String> params = exchange.getRequest().getQueryParams(); // 2.获取authorization参数 String auth = params.getFirst("authorization"); // 3.校验 if ("admin".equals(auth)) { // 放行 return chain.filter(exchange); } // 4.拦截 // 4.1.禁止访问,设置状态码 exchange.getResponse().setStatusCode(HttpStatus.FORBIDDEN); // 4.2.结束处理 return exchange.getResponse().setComplete(); } }3.5.3.过滤器执行顺序请求进入网关会碰到三类过滤器:当前路由的过滤器、DefaultFilter、GlobalFilter请求路由后,会将当前路由过滤器和DefaultFilter、GlobalFilter,合并到一个过滤器链(集合)中,排序后依次执行每个过滤器:排序的规则是什么呢?每一个过滤器都必须指定一个int类型的order值,order值越小,优先级越高,执行顺序越靠前。GlobalFilter通过实现Ordered接口,或者添加@Order注解来指定order值,由我们自己指定路由过滤器和defaultFilter的order由Spring指定,默认是按照声明顺序从1递增。当过滤器的order值一样时,会按照 defaultFilter > 路由过滤器 > GlobalFilter的顺序执行。详细内容,可以查看源码:org.springframework.cloud.gateway.route.RouteDefinitionRouteLocator#getFilters()方法是先加载defaultFilters,然后再加载某个route的filters,然后合并。org.springframework.cloud.gateway.handler.FilteringWebHandler#handle()方法会加载全局过滤器,与前面的过滤器合并后根据order排序,组织过滤器链3.6.跨域问题3.6.1.什么是跨域问题跨域:域名不一致就是跨域,主要包括:域名不同: www.taobao.com 和 www.taobao.org 和 www.jd.com 和 miaosha.jd.com域名相同,端口不同:localhost:8080和localhost8081跨域问题:浏览器禁止请求的发起者与服务端发生跨域ajax请求,请求被浏览器拦截的问题解决方案:CORS,这个以前应该学习过,这里不再赘述了。不知道的小伙伴可以查看https://www.ruanyifeng.com/blog/2016/04/cors.html3.6.2.模拟跨域问题找到课前资料的页面文件:放入tomcat或者nginx这样的web服务器中,启动并访问。可以在浏览器控制台看到下面的错误:从localhost:8090访问localhost:10010,端口不同,显然是跨域的请求。3.6.3.解决跨域问题在gateway服务的application.yml文件中,添加下面的配置:spring: cloud: gateway: # 。。。 globalcors: # 全局的跨域处理 add-to-simple-url-handler-mapping: true # 解决options请求被拦截问题 corsConfigurations: '[/**]': allowedOrigins: # 允许哪些网站的跨域请求 - "http://localhost:8090" allowedMethods: # 允许的跨域ajax的请求方式 - "GET" - "POST" - "DELETE" - "PUT" - "OPTIONS" allowedHeaders: "*" # 允许在请求中携带的头信息 allowCredentials: true # 是否允许携带cookie maxAge: 360000 # 这次跨域检测的有效期
-
Nacos集群搭建 Nacos集群搭建1.集群结构图官方给出的Nacos集群图:其中包含3个nacos节点,然后一个负载均衡器代理3个Nacos。这里负载均衡器可以使用nginx。我们计划的集群结构:三个nacos节点的地址:节点ipportnacos1192.168.150.18845nacos2192.168.150.18846nacos3192.168.150.188472.搭建集群搭建集群的基本步骤:搭建数据库,初始化数据库表结构下载nacos安装包配置nacos启动nacos集群nginx反向代理2.1.初始化数据库Nacos默认数据存储在内嵌数据库Derby中,不属于生产可用的数据库。官方推荐的最佳实践是使用带有主从的高可用数据库集群,主从模式的高可用数据库可以参考传智教育的后续高手课程。这里我们以单点的数据库为例来讲解。首先新建一个数据库,命名为nacos,而后导入下面的SQL:CREATE TABLE `config_info` ( `id` bigint(20) NOT NULL AUTO_INCREMENT COMMENT 'id', `data_id` varchar(255) NOT NULL COMMENT 'data_id', `group_id` varchar(255) DEFAULT NULL, `content` longtext NOT NULL COMMENT 'content', `md5` varchar(32) DEFAULT NULL COMMENT 'md5', `gmt_create` datetime NOT NULL DEFAULT CURRENT_TIMESTAMP COMMENT '创建时间', `gmt_modified` datetime NOT NULL DEFAULT CURRENT_TIMESTAMP COMMENT '修改时间', `src_user` text COMMENT 'source user', `src_ip` varchar(50) DEFAULT NULL COMMENT 'source ip', `app_name` varchar(128) DEFAULT NULL, `tenant_id` varchar(128) DEFAULT '' COMMENT '租户字段', `c_desc` varchar(256) DEFAULT NULL, `c_use` varchar(64) DEFAULT NULL, `effect` varchar(64) DEFAULT NULL, `type` varchar(64) DEFAULT NULL, `c_schema` text, PRIMARY KEY (`id`), UNIQUE KEY `uk_configinfo_datagrouptenant` (`data_id`,`group_id`,`tenant_id`) ) ENGINE=InnoDB DEFAULT CHARSET=utf8 COLLATE=utf8_bin COMMENT='config_info'; /******************************************/ /* 数据库全名 = nacos_config */ /* 表名称 = config_info_aggr */ /******************************************/ CREATE TABLE `config_info_aggr` ( `id` bigint(20) NOT NULL AUTO_INCREMENT COMMENT 'id', `data_id` varchar(255) NOT NULL COMMENT 'data_id', `group_id` varchar(255) NOT NULL COMMENT 'group_id', `datum_id` varchar(255) NOT NULL COMMENT 'datum_id', `content` longtext NOT NULL COMMENT '内容', `gmt_modified` datetime NOT NULL COMMENT '修改时间', `app_name` varchar(128) DEFAULT NULL, `tenant_id` varchar(128) DEFAULT '' COMMENT '租户字段', PRIMARY KEY (`id`), UNIQUE KEY `uk_configinfoaggr_datagrouptenantdatum` (`data_id`,`group_id`,`tenant_id`,`datum_id`) ) ENGINE=InnoDB DEFAULT CHARSET=utf8 COLLATE=utf8_bin COMMENT='增加租户字段'; /******************************************/ /* 数据库全名 = nacos_config */ /* 表名称 = config_info_beta */ /******************************************/ CREATE TABLE `config_info_beta` ( `id` bigint(20) NOT NULL AUTO_INCREMENT COMMENT 'id', `data_id` varchar(255) NOT NULL COMMENT 'data_id', `group_id` varchar(128) NOT NULL COMMENT 'group_id', `app_name` varchar(128) DEFAULT NULL COMMENT 'app_name', `content` longtext NOT NULL COMMENT 'content', `beta_ips` varchar(1024) DEFAULT NULL COMMENT 'betaIps', `md5` varchar(32) DEFAULT NULL COMMENT 'md5', `gmt_create` datetime NOT NULL DEFAULT CURRENT_TIMESTAMP COMMENT '创建时间', `gmt_modified` datetime NOT NULL DEFAULT CURRENT_TIMESTAMP COMMENT '修改时间', `src_user` text COMMENT 'source user', `src_ip` varchar(50) DEFAULT NULL COMMENT 'source ip', `tenant_id` varchar(128) DEFAULT '' COMMENT '租户字段', PRIMARY KEY (`id`), UNIQUE KEY `uk_configinfobeta_datagrouptenant` (`data_id`,`group_id`,`tenant_id`) ) ENGINE=InnoDB DEFAULT CHARSET=utf8 COLLATE=utf8_bin COMMENT='config_info_beta'; /******************************************/ /* 数据库全名 = nacos_config */ /* 表名称 = config_info_tag */ /******************************************/ CREATE TABLE `config_info_tag` ( `id` bigint(20) NOT NULL AUTO_INCREMENT COMMENT 'id', `data_id` varchar(255) NOT NULL COMMENT 'data_id', `group_id` varchar(128) NOT NULL COMMENT 'group_id', `tenant_id` varchar(128) DEFAULT '' COMMENT 'tenant_id', `tag_id` varchar(128) NOT NULL COMMENT 'tag_id', `app_name` varchar(128) DEFAULT NULL COMMENT 'app_name', `content` longtext NOT NULL COMMENT 'content', `md5` varchar(32) DEFAULT NULL COMMENT 'md5', `gmt_create` datetime NOT NULL DEFAULT CURRENT_TIMESTAMP COMMENT '创建时间', `gmt_modified` datetime NOT NULL DEFAULT CURRENT_TIMESTAMP COMMENT '修改时间', `src_user` text COMMENT 'source user', `src_ip` varchar(50) DEFAULT NULL COMMENT 'source ip', PRIMARY KEY (`id`), UNIQUE KEY `uk_configinfotag_datagrouptenanttag` (`data_id`,`group_id`,`tenant_id`,`tag_id`) ) ENGINE=InnoDB DEFAULT CHARSET=utf8 COLLATE=utf8_bin COMMENT='config_info_tag'; /******************************************/ /* 数据库全名 = nacos_config */ /* 表名称 = config_tags_relation */ /******************************************/ CREATE TABLE `config_tags_relation` ( `id` bigint(20) NOT NULL COMMENT 'id', `tag_name` varchar(128) NOT NULL COMMENT 'tag_name', `tag_type` varchar(64) DEFAULT NULL COMMENT 'tag_type', `data_id` varchar(255) NOT NULL COMMENT 'data_id', `group_id` varchar(128) NOT NULL COMMENT 'group_id', `tenant_id` varchar(128) DEFAULT '' COMMENT 'tenant_id', `nid` bigint(20) NOT NULL AUTO_INCREMENT, PRIMARY KEY (`nid`), UNIQUE KEY `uk_configtagrelation_configidtag` (`id`,`tag_name`,`tag_type`), KEY `idx_tenant_id` (`tenant_id`) ) ENGINE=InnoDB DEFAULT CHARSET=utf8 COLLATE=utf8_bin COMMENT='config_tag_relation'; /******************************************/ /* 数据库全名 = nacos_config */ /* 表名称 = group_capacity */ /******************************************/ CREATE TABLE `group_capacity` ( `id` bigint(20) unsigned NOT NULL AUTO_INCREMENT COMMENT '主键ID', `group_id` varchar(128) NOT NULL DEFAULT '' COMMENT 'Group ID,空字符表示整个集群', `quota` int(10) unsigned NOT NULL DEFAULT '0' COMMENT '配额,0表示使用默认值', `usage` int(10) unsigned NOT NULL DEFAULT '0' COMMENT '使用量', `max_size` int(10) unsigned NOT NULL DEFAULT '0' COMMENT '单个配置大小上限,单位为字节,0表示使用默认值', `max_aggr_count` int(10) unsigned NOT NULL DEFAULT '0' COMMENT '聚合子配置最大个数,,0表示使用默认值', `max_aggr_size` int(10) unsigned NOT NULL DEFAULT '0' COMMENT '单个聚合数据的子配置大小上限,单位为字节,0表示使用默认值', `max_history_count` int(10) unsigned NOT NULL DEFAULT '0' COMMENT '最大变更历史数量', `gmt_create` datetime NOT NULL DEFAULT CURRENT_TIMESTAMP COMMENT '创建时间', `gmt_modified` datetime NOT NULL DEFAULT CURRENT_TIMESTAMP COMMENT '修改时间', PRIMARY KEY (`id`), UNIQUE KEY `uk_group_id` (`group_id`) ) ENGINE=InnoDB DEFAULT CHARSET=utf8 COLLATE=utf8_bin COMMENT='集群、各Group容量信息表'; /******************************************/ /* 数据库全名 = nacos_config */ /* 表名称 = his_config_info */ /******************************************/ CREATE TABLE `his_config_info` ( `id` bigint(64) unsigned NOT NULL, `nid` bigint(20) unsigned NOT NULL AUTO_INCREMENT, `data_id` varchar(255) NOT NULL, `group_id` varchar(128) NOT NULL, `app_name` varchar(128) DEFAULT NULL COMMENT 'app_name', `content` longtext NOT NULL, `md5` varchar(32) DEFAULT NULL, `gmt_create` datetime NOT NULL DEFAULT CURRENT_TIMESTAMP, `gmt_modified` datetime NOT NULL DEFAULT CURRENT_TIMESTAMP, `src_user` text, `src_ip` varchar(50) DEFAULT NULL, `op_type` char(10) DEFAULT NULL, `tenant_id` varchar(128) DEFAULT '' COMMENT '租户字段', PRIMARY KEY (`nid`), KEY `idx_gmt_create` (`gmt_create`), KEY `idx_gmt_modified` (`gmt_modified`), KEY `idx_did` (`data_id`) ) ENGINE=InnoDB DEFAULT CHARSET=utf8 COLLATE=utf8_bin COMMENT='多租户改造'; /******************************************/ /* 数据库全名 = nacos_config */ /* 表名称 = tenant_capacity */ /******************************************/ CREATE TABLE `tenant_capacity` ( `id` bigint(20) unsigned NOT NULL AUTO_INCREMENT COMMENT '主键ID', `tenant_id` varchar(128) NOT NULL DEFAULT '' COMMENT 'Tenant ID', `quota` int(10) unsigned NOT NULL DEFAULT '0' COMMENT '配额,0表示使用默认值', `usage` int(10) unsigned NOT NULL DEFAULT '0' COMMENT '使用量', `max_size` int(10) unsigned NOT NULL DEFAULT '0' COMMENT '单个配置大小上限,单位为字节,0表示使用默认值', `max_aggr_count` int(10) unsigned NOT NULL DEFAULT '0' COMMENT '聚合子配置最大个数', `max_aggr_size` int(10) unsigned NOT NULL DEFAULT '0' COMMENT '单个聚合数据的子配置大小上限,单位为字节,0表示使用默认值', `max_history_count` int(10) unsigned NOT NULL DEFAULT '0' COMMENT '最大变更历史数量', `gmt_create` datetime NOT NULL DEFAULT CURRENT_TIMESTAMP COMMENT '创建时间', `gmt_modified` datetime NOT NULL DEFAULT CURRENT_TIMESTAMP COMMENT '修改时间', PRIMARY KEY (`id`), UNIQUE KEY `uk_tenant_id` (`tenant_id`) ) ENGINE=InnoDB DEFAULT CHARSET=utf8 COLLATE=utf8_bin COMMENT='租户容量信息表'; CREATE TABLE `tenant_info` ( `id` bigint(20) NOT NULL AUTO_INCREMENT COMMENT 'id', `kp` varchar(128) NOT NULL COMMENT 'kp', `tenant_id` varchar(128) default '' COMMENT 'tenant_id', `tenant_name` varchar(128) default '' COMMENT 'tenant_name', `tenant_desc` varchar(256) DEFAULT NULL COMMENT 'tenant_desc', `create_source` varchar(32) DEFAULT NULL COMMENT 'create_source', `gmt_create` bigint(20) NOT NULL COMMENT '创建时间', `gmt_modified` bigint(20) NOT NULL COMMENT '修改时间', PRIMARY KEY (`id`), UNIQUE KEY `uk_tenant_info_kptenantid` (`kp`,`tenant_id`), KEY `idx_tenant_id` (`tenant_id`) ) ENGINE=InnoDB DEFAULT CHARSET=utf8 COLLATE=utf8_bin COMMENT='tenant_info'; CREATE TABLE `users` ( `username` varchar(50) NOT NULL PRIMARY KEY, `password` varchar(500) NOT NULL, `enabled` boolean NOT NULL ); CREATE TABLE `roles` ( `username` varchar(50) NOT NULL, `role` varchar(50) NOT NULL, UNIQUE INDEX `idx_user_role` (`username` ASC, `role` ASC) USING BTREE ); CREATE TABLE `permissions` ( `role` varchar(50) NOT NULL, `resource` varchar(255) NOT NULL, `action` varchar(8) NOT NULL, UNIQUE INDEX `uk_role_permission` (`role`,`resource`,`action`) USING BTREE ); INSERT INTO users (username, password, enabled) VALUES ('nacos', '$2a$10$EuWPZHzz32dJN7jexM34MOeYirDdFAZm2kuWj7VEOJhhZkDrxfvUu', TRUE); INSERT INTO roles (username, role) VALUES ('nacos', 'ROLE_ADMIN');2.2.下载nacosnacos在GitHub上有下载地址:https://github.com/alibaba/nacos/tags,可以选择任意版本下载。本例中才用1.4.1版本:2.3.配置Nacos将这个包解压到任意非中文目录下,如图:目录说明:bin:启动脚本conf:配置文件进入nacos的conf目录,修改配置文件cluster.conf.example,重命名为cluster.conf:然后添加内容:127.0.0.1:8845 127.0.0.1.8846 127.0.0.1.8847然后修改application.properties文件,添加数据库配置spring.datasource.platform=mysql db.num=1 db.url.0=jdbc:mysql://127.0.0.1:3306/nacos?characterEncoding=utf8&connectTimeout=1000&socketTimeout=3000&autoReconnect=true&useUnicode=true&useSSL=false&serverTimezone=UTC db.user.0=root db.password.0=1232.4.启动将nacos文件夹复制三份,分别命名为:nacos1、nacos2、nacos3 然后分别修改三个文件夹中的application.properties,nacos1:server.port=8845nacos2:server.port=8846nacos3:server.port=8847然后分别启动三个nacos节点:startup.cmd2.5.nginx反向代理找到课前资料提供的nginx安装包: 解压到任意非中文目录下: 修改conf/nginx.conf文件,配置如下:upstream nacos-cluster { server 127.0.0.1:8845; server 127.0.0.1:8846; server 127.0.0.1:8847; } server { listen 80; server_name localhost; location /nacos { proxy_pass http://nacos-cluster; } }而后在浏览器访问:http://localhost/nacos即可。代码中application.yml文件配置如下:spring: cloud: nacos: server-addr: localhost:80 # Nacos地址2.6.优化实际部署时,需要给做反向代理的nginx服务器设置一个域名,这样后续如果有服务器迁移nacos的客户端也无需更改配置.Nacos的各个节点应该部署到多个不同服务器,做好容灾和隔离
-
Nacos与Eureka SpringCloud011.认识微服务随着互联网行业的发展,对服务的要求也越来越高,服务架构也从单体架构逐渐演变为现在流行的微服务架构。这些架构之间有怎样的差别呢?1.0.学习目标了解微服务架构的优缺点1.1.单体架构单体架构:将业务的所有功能集中在一个项目中开发,打成一个包部署。单体架构的优缺点如下:优点:架构简单部署成本低缺点:耦合度高(维护困难、升级困难)1.2.分布式架构分布式架构:根据业务功能对系统做拆分,每个业务功能模块作为独立项目开发,称为一个服务。分布式架构的优缺点:优点:降低服务耦合有利于服务升级和拓展缺点:服务调用关系错综复杂分布式架构虽然降低了服务耦合,但是服务拆分时也有很多问题需要思考:服务拆分的粒度如何界定?服务之间如何调用?服务的调用关系如何管理?人们需要制定一套行之有效的标准来约束分布式架构。1.3.微服务微服务的架构特征:单一职责:微服务拆分粒度更小,每一个服务都对应唯一的业务能力,做到单一职责自治:团队独立、技术独立、数据独立,独立部署和交付面向服务:服务提供统一标准的接口,与语言和技术无关隔离性强:服务调用做好隔离、容错、降级,避免出现级联问题微服务的上述特性其实是在给分布式架构制定一个标准,进一步降低服务之间的耦合度,提供服务的独立性和灵活性。做到高内聚,低耦合。因此,可以认为微服务是一种经过良好架构设计的分布式架构方案 。但方案该怎么落地?选用什么样的技术栈?全球的互联网公司都在积极尝试自己的微服务落地方案。其中在Java领域最引人注目的就是SpringCloud提供的方案了。1.4.SpringCloudSpringCloud是目前国内使用最广泛的微服务框架。官网地址:https://spring.io/projects/spring-cloud。SpringCloud集成了各种微服务功能组件,并基于SpringBoot实现了这些组件的自动装配,从而提供了良好的开箱即用体验。其中常见的组件包括:另外,SpringCloud底层是依赖于SpringBoot的,并且有版本的兼容关系,如下:我们课堂学习的版本是 Hoxton.SR10,因此对应的SpringBoot版本是2.3.x版本。1.5.总结单体架构:简单方便,高度耦合,扩展性差,适合小型项目。例如:学生管理系统分布式架构:松耦合,扩展性好,但架构复杂,难度大。适合大型互联网项目,例如:京东、淘宝微服务:一种良好的分布式架构方案①优点:拆分粒度更小、服务更独立、耦合度更低②缺点:架构非常复杂,运维、监控、部署难度提高SpringCloud是微服务架构的一站式解决方案,集成了各种优秀微服务功能组件2.服务拆分和远程调用任何分布式架构都离不开服务的拆分,微服务也是一样。2.1.服务拆分原则这里我总结了微服务拆分时的几个原则:不同微服务,不要重复开发相同业务微服务数据独立,不要访问其它微服务的数据库微服务可以将自己的业务暴露为接口,供其它微服务调用2.2.服务拆分示例以课前资料中的微服务cloud-demo为例,其结构如下:cloud-demo:父工程,管理依赖order-service:订单微服务,负责订单相关业务user-service:用户微服务,负责用户相关业务要求:订单微服务和用户微服务都必须有各自的数据库,相互独立订单服务和用户服务都对外暴露Restful的接口订单服务如果需要查询用户信息,只能调用用户服务的Restful接口,不能查询用户数据库2.2.1.导入Sql语句首先,将课前资料提供的cloud-order.sql和cloud-user.sql导入到mysql中:cloud-user表中初始数据如下:cloud-order表中初始数据如下:cloud-order表中持有cloud-user表中的id字段。2.2.2.导入demo工程用IDEA导入课前资料提供的Demo:项目结构如下:导入后,会在IDEA右下角出现弹窗:点击弹窗,然后按下图选择:会出现这样的菜单:配置下项目使用的JDK:2.3.实现远程调用案例在order-service服务中,有一个根据id查询订单的接口:根据id查询订单,返回值是Order对象,如图:其中的user为null在user-service中有一个根据id查询用户的接口:查询的结果如图:2.3.1.案例需求:修改order-service中的根据id查询订单业务,要求在查询订单的同时,根据订单中包含的userId查询出用户信息,一起返回。因此,我们需要在order-service中 向user-service发起一个http的请求,调用http://localhost:8081/user/{userId}这个接口。大概的步骤是这样的:注册一个RestTemplate的实例到Spring容器修改order-service服务中的OrderService类中的queryOrderById方法,根据Order对象中的userId查询User将查询的User填充到Order对象,一起返回2.3.2.注册RestTemplate首先,我们在order-service服务中的OrderApplication启动类中,注册RestTemplate实例:package cn.itcast.order; import org.mybatis.spring.annotation.MapperScan; import org.springframework.boot.SpringApplication; import org.springframework.boot.autoconfigure.SpringBootApplication; import org.springframework.context.annotation.Bean; import org.springframework.web.client.RestTemplate; @MapperScan("cn.itcast.order.mapper") @SpringBootApplication public class OrderApplication { public static void main(String[] args) { SpringApplication.run(OrderApplication.class, args); } @Bean public RestTemplate restTemplate() { return new RestTemplate(); } }2.3.3.实现远程调用修改order-service服务中的cn.itcast.order.service包下的OrderService类中的queryOrderById方法:2.4.提供者与消费者在服务调用关系中,会有两个不同的角色:服务提供者:一次业务中,被其它微服务调用的服务。(提供接口给其它微服务)服务消费者:一次业务中,调用其它微服务的服务。(调用其它微服务提供的接口)但是,服务提供者与服务消费者的角色并不是绝对的,而是相对于业务而言。如果服务A调用了服务B,而服务B又调用了服务C,服务B的角色是什么?对于A调用B的业务而言:A是服务消费者,B是服务提供者对于B调用C的业务而言:B是服务消费者,C是服务提供者因此,服务B既可以是服务提供者,也可以是服务消费者。3.Eureka注册中心假如我们的服务提供者user-service部署了多个实例,如图:大家思考几个问题:order-service在发起远程调用的时候,该如何得知user-service实例的ip地址和端口?有多个user-service实例地址,order-service调用时该如何选择?order-service如何得知某个user-service实例是否依然健康,是不是已经宕机?3.1.Eureka的结构和作用这些问题都需要利用SpringCloud中的注册中心来解决,其中最广为人知的注册中心就是Eureka,其结构如下:回答之前的各个问题。问题1:order-service如何得知user-service实例地址?获取地址信息的流程如下:user-service服务实例启动后,将自己的信息注册到eureka-server(Eureka服务端)。这个叫服务注册eureka-server保存服务名称到服务实例地址列表的映射关系order-service根据服务名称,拉取实例地址列表。这个叫服务发现或服务拉取问题2:order-service如何从多个user-service实例中选择具体的实例?order-service从实例列表中利用负载均衡算法选中一个实例地址向该实例地址发起远程调用问题3:order-service如何得知某个user-service实例是否依然健康,是不是已经宕机?user-service会每隔一段时间(默认30秒)向eureka-server发起请求,报告自己状态,称为心跳当超过一定时间没有发送心跳时,eureka-server会认为微服务实例故障,将该实例从服务列表中剔除order-service拉取服务时,就能将故障实例排除了注意:一个微服务,既可以是服务提供者,又可以是服务消费者,因此eureka将服务注册、服务发现等功能统一封装到了eureka-client端因此,接下来我们动手实践的步骤包括:3.2.搭建eureka-server首先大家注册中心服务端:eureka-server,这必须是一个独立的微服务3.2.1.创建eureka-server服务在cloud-demo父工程下,创建一个子模块:填写模块信息:然后填写服务信息:3.2.2.引入eureka依赖引入SpringCloud为eureka提供的starter依赖:<dependency> <groupId>org.springframework.cloud</groupId> <artifactId>spring-cloud-starter-netflix-eureka-server</artifactId> </dependency>3.2.3.编写启动类给eureka-server服务编写一个启动类,一定要添加一个@EnableEurekaServer注解,开启eureka的注册中心功能:package cn.itcast.eureka; import org.springframework.boot.SpringApplication; import org.springframework.boot.autoconfigure.SpringBootApplication; import org.springframework.cloud.netflix.eureka.server.EnableEurekaServer; @SpringBootApplication @EnableEurekaServer public class EurekaApplication { public static void main(String[] args) { SpringApplication.run(EurekaApplication.class, args); } }3.2.4.编写配置文件编写一个application.yml文件,内容如下:server: port: 10086 spring: application: name: eureka-server eureka: client: service-url: defaultZone: http://127.0.0.1:10086/eureka3.2.5.启动服务启动微服务,然后在浏览器访问:http://127.0.0.1:10086看到下面结果应该是成功了:3.3.服务注册下面,我们将user-service注册到eureka-server中去。1)引入依赖在user-service的pom文件中,引入下面的eureka-client依赖:<dependency> <groupId>org.springframework.cloud</groupId> <artifactId>spring-cloud-starter-netflix-eureka-client</artifactId> </dependency>2)配置文件在user-service中,修改application.yml文件,添加服务名称、eureka地址:spring: application: name: userservice eureka: client: service-url: defaultZone: http://127.0.0.1:10086/eureka3)启动多个user-service实例为了演示一个服务有多个实例的场景,我们添加一个SpringBoot的启动配置,再启动一个user-service。首先,复制原来的user-service启动配置:然后,在弹出的窗口中,填写信息:现在,SpringBoot窗口会出现两个user-service启动配置:不过,第一个是8081端口,第二个是8082端口。启动两个user-service实例:查看eureka-server管理页面:3.4.服务发现下面,我们将order-service的逻辑修改:向eureka-server拉取user-service的信息,实现服务发现。1)引入依赖之前说过,服务发现、服务注册统一都封装在eureka-client依赖,因此这一步与服务注册时一致。在order-service的pom文件中,引入下面的eureka-client依赖:<dependency> <groupId>org.springframework.cloud</groupId> <artifactId>spring-cloud-starter-netflix-eureka-client</artifactId> </dependency>2)配置文件服务发现也需要知道eureka地址,因此第二步与服务注册一致,都是配置eureka信息:在order-service中,修改application.yml文件,添加服务名称、eureka地址:spring: application: name: orderservice eureka: client: service-url: defaultZone: http://127.0.0.1:10086/eureka3)服务拉取和负载均衡最后,我们要去eureka-server中拉取user-service服务的实例列表,并且实现负载均衡。不过这些动作不用我们去做,只需要添加一些注解即可。在order-service的OrderApplication中,给RestTemplate这个Bean添加一个@LoadBalanced注解:修改order-service服务中的cn.itcast.order.service包下的OrderService类中的queryOrderById方法。修改访问的url路径,用服务名代替ip、端口:spring会自动帮助我们从eureka-server端,根据userservice这个服务名称,获取实例列表,而后完成负载均衡。4.Ribbon负载均衡上一节中,我们添加了@LoadBalanced注解,即可实现负载均衡功能,这是什么原理呢?4.1.负载均衡原理SpringCloud底层其实是利用了一个名为Ribbon的组件,来实现负载均衡功能的。那么我们发出的请求明明是http://userservice/user/1,怎么变成了http://localhost:8081的呢?4.2.源码跟踪为什么我们只输入了service名称就可以访问了呢?之前还要获取ip和端口。显然有人帮我们根据service名称,获取到了服务实例的ip和端口。它就是LoadBalancerInterceptor,这个类会在对RestTemplate的请求进行拦截,然后从Eureka根据服务id获取服务列表,随后利用负载均衡算法得到真实的服务地址信息,替换服务id。我们进行源码跟踪:1)LoadBalancerIntercepor可以看到这里的intercept方法,拦截了用户的HttpRequest请求,然后做了几件事:request.getURI():获取请求uri,本例中就是 http://user-service/user/8originalUri.getHost():获取uri路径的主机名,其实就是服务id,user-servicethis.loadBalancer.execute():处理服务id,和用户请求。这里的this.loadBalancer是LoadBalancerClient类型,我们继续跟入。2)LoadBalancerClient继续跟入execute方法:代码是这样的:getLoadBalancer(serviceId):根据服务id获取ILoadBalancer,而ILoadBalancer会拿着服务id去eureka中获取服务列表并保存起来。getServer(loadBalancer):利用内置的负载均衡算法,从服务列表中选择一个。本例中,可以看到获取了8082端口的服务放行后,再次访问并跟踪,发现获取的是8081:果然实现了负载均衡。3)负载均衡策略IRule在刚才的代码中,可以看到获取服务使通过一个getServer方法来做负载均衡:我们继续跟入:继续跟踪源码chooseServer方法,发现这么一段代码:我们看看这个rule是谁:这里的rule默认值是一个RoundRobinRule,看类的介绍:这不就是轮询的意思嘛。到这里,整个负载均衡的流程我们就清楚了。4)总结SpringCloudRibbon的底层采用了一个拦截器,拦截了RestTemplate发出的请求,对地址做了修改。用一幅图来总结一下:基本流程如下:拦截我们的RestTemplate请求http://userservice/user/1RibbonLoadBalancerClient会从请求url中获取服务名称,也就是user-serviceDynamicServerListLoadBalancer根据user-service到eureka拉取服务列表eureka返回列表,localhost:8081、localhost:8082IRule利用内置负载均衡规则,从列表中选择一个,例如localhost:8081RibbonLoadBalancerClient修改请求地址,用localhost:8081替代userservice,得到http://localhost:8081/user/1,发起真实请求4.3.负载均衡策略4.3.1.负载均衡策略负载均衡的规则都定义在IRule接口中,而IRule有很多不同的实现类:不同规则的含义如下:内置负载均衡规则类规则描述RoundRobinRule简单轮询服务列表来选择服务器。它是Ribbon默认的负载均衡规则。AvailabilityFilteringRule对以下两种服务器进行忽略: (1)在默认情况下,这台服务器如果3次连接失败,这台服务器就会被设置为“短路”状态。短路状态将持续30秒,如果再次连接失败,短路的持续时间就会几何级地增加。 (2)并发数过高的服务器。如果一个服务器的并发连接数过高,配置了AvailabilityFilteringRule规则的客户端也会将其忽略。并发连接数的上限,可以由客户端的..ActiveConnectionsLimit属性进行配置。WeightedResponseTimeRule为每一个服务器赋予一个权重值。服务器响应时间越长,这个服务器的权重就越小。这个规则会随机选择服务器,这个权重值会影响服务器的选择。ZoneAvoidanceRule以区域可用的服务器为基础进行服务器的选择。使用Zone对服务器进行分类,这个Zone可以理解为一个机房、一个机架等。而后再对Zone内的多个服务做轮询。BestAvailableRule忽略那些短路的服务器,并选择并发数较低的服务器。RandomRule随机选择一个可用的服务器。RetryRule重试机制的选择逻辑默认的实现就是ZoneAvoidanceRule,是一种轮询方案4.3.2.自定义负载均衡策略通过定义IRule实现可以修改负载均衡规则,有两种方式:代码方式:在order-service中的OrderApplication类中,定义一个新的IRule:@Bean public IRule randomRule(){ return new RandomRule(); }配置文件方式:在order-service的application.yml文件中,添加新的配置也可以修改规则:userservice: # 给某个微服务配置负载均衡规则,这里是userservice服务 ribbon: NFLoadBalancerRuleClassName: com.netflix.loadbalancer.RandomRule # 负载均衡规则 注意,一般用默认的负载均衡规则,不做修改。4.4.饥饿加载Ribbon默认是采用懒加载,即第一次访问时才会去创建LoadBalanceClient,请求时间会很长。而饥饿加载则会在项目启动时创建,降低第一次访问的耗时,通过下面配置开启饥饿加载:ribbon: eager-load: enabled: true clients: userservice5.Nacos注册中心国内公司一般都推崇阿里巴巴的技术,比如注册中心,SpringCloudAlibaba也推出了一个名为Nacos的注册中心。5.1.认识和安装NacosNacos是阿里巴巴的产品,现在是SpringCloud中的一个组件。相比Eureka功能更加丰富,在国内受欢迎程度较高。安装方式可以参考课前资料《Nacos安装指南.md》5.2.服务注册到nacosNacos是SpringCloudAlibaba的组件,而SpringCloudAlibaba也遵循SpringCloud中定义的服务注册、服务发现规范。因此使用Nacos和使用Eureka对于微服务来说,并没有太大区别。主要差异在于:依赖不同服务地址不同1)引入依赖在cloud-demo父工程的pom文件中的<dependencyManagement>中引入SpringCloudAlibaba的依赖:<dependency> <groupId>com.alibaba.cloud</groupId> <artifactId>spring-cloud-alibaba-dependencies</artifactId> <version>2.2.6.RELEASE</version> <type>pom</type> <scope>import</scope> </dependency>然后在user-service和order-service中的pom文件中引入nacos-discovery依赖:<dependency> <groupId>com.alibaba.cloud</groupId> <artifactId>spring-cloud-starter-alibaba-nacos-discovery</artifactId> </dependency>注意:不要忘了注释掉eureka的依赖。2)配置nacos地址在user-service和order-service的application.yml中添加nacos地址:spring: cloud: nacos: server-addr: localhost:8848注意:不要忘了注释掉eureka的地址3)重启重启微服务后,登录nacos管理页面,可以看到微服务信息:5.3.服务分级存储模型一个服务可以有多个实例,例如我们的user-service,可以有:127.0.0.1:8081127.0.0.1:8082127.0.0.1:8083假如这些实例分布于全国各地的不同机房,例如:127.0.0.1:8081,在上海机房127.0.0.1:8082,在上海机房127.0.0.1:8083,在杭州机房Nacos就将同一机房内的实例 划分为一个集群。也就是说,user-service是服务,一个服务可以包含多个集群,如杭州、上海,每个集群下可以有多个实例,形成分级模型,如图:微服务互相访问时,应该尽可能访问同集群实例,因为本地访问速度更快。当本集群内不可用时,才访问其它集群。例如:杭州机房内的order-service应该优先访问同机房的user-service。5.3.1.给user-service配置集群修改user-service的application.yml文件,添加集群配置:spring: cloud: nacos: server-addr: localhost:8848 discovery: cluster-name: HZ # 集群名称重启两个user-service实例后,我们可以在nacos控制台看到下面结果:我们再次复制一个user-service启动配置,添加属性:-Dserver.port=8083 -Dspring.cloud.nacos.discovery.cluster-name=SH配置如图所示:启动UserApplication3后再次查看nacos控制台:5.3.2.同集群优先的负载均衡默认的ZoneAvoidanceRule并不能实现根据同集群优先来实现负载均衡。因此Nacos中提供了一个NacosRule的实现,可以优先从同集群中挑选实例。1)给order-service配置集群信息修改order-service的application.yml文件,添加集群配置:spring: cloud: nacos: server-addr: localhost:8848 discovery: cluster-name: HZ # 集群名称2)修改负载均衡规则修改order-service的application.yml文件,修改负载均衡规则:userservice: ribbon: NFLoadBalancerRuleClassName: com.alibaba.cloud.nacos.ribbon.NacosRule # 负载均衡规则 5.4.权重配置实际部署中会出现这样的场景:服务器设备性能有差异,部分实例所在机器性能较好,另一些较差,我们希望性能好的机器承担更多的用户请求。但默认情况下NacosRule是同集群内随机挑选,不会考虑机器的性能问题。因此,Nacos提供了权重配置来控制访问频率,权重越大则访问频率越高。在nacos控制台,找到user-service的实例列表,点击编辑,即可修改权重:在弹出的编辑窗口,修改权重:注意:如果权重修改为0,则该实例永远不会被访问5.5.环境隔离Nacos提供了namespace来实现环境隔离功能。nacos中可以有多个namespacenamespace下可以有group、service等不同namespace之间相互隔离,例如不同namespace的服务互相不可见5.5.1.创建namespace默认情况下,所有service、data、group都在同一个namespace,名为public:我们可以点击页面新增按钮,添加一个namespace:然后,填写表单:就能在页面看到一个新的namespace:5.5.2.给微服务配置namespace给微服务配置namespace只能通过修改配置来实现。例如,修改order-service的application.yml文件:spring: cloud: nacos: server-addr: localhost:8848 discovery: cluster-name: HZ namespace: 492a7d5d-237b-46a1-a99a-fa8e98e4b0f9 # 命名空间,填ID重启order-service后,访问控制台,可以看到下面的结果:此时访问order-service,因为namespace不同,会导致找不到userservice,控制台会报错:5.6.Nacos与Eureka的区别Nacos的服务实例分为两种l类型:临时实例:如果实例宕机超过一定时间,会从服务列表剔除,默认的类型。非临时实例:如果实例宕机,不会从服务列表剔除,也可以叫永久实例。配置一个服务实例为永久实例:spring: cloud: nacos: discovery: ephemeral: false # 设置为非临时实例Nacos和Eureka整体结构类似,服务注册、服务拉取、心跳等待,但是也存在一些差异:Nacos与eureka的共同点都支持服务注册和服务拉取都支持服务提供者心跳方式做健康检测Nacos与Eureka的区别Nacos支持服务端主动检测提供者状态:临时实例采用心跳模式,非临时实例采用主动检测模式临时实例心跳不正常会被剔除,非临时实例则不会被剔除Nacos支持服务列表变更的消息推送模式,服务列表更新更及时Nacos集群默认采用AP方式,当集群中存在非临时实例时,采用CP模式;Eureka采用AP方式
-
2023国庆川西自驾游 2023国庆川西自驾游国庆在家待了2天,自驾游川西3天,提前2天回来。整个行程3天,时间比较紧,全程700公里左右,主要景点:红海子、斯丁措、鱼子西、新都桥、折多山。自驾车型:城市SUV,1.4T排量。自驾前准备:0、安全:检车辆车胎气压、油、玻璃水、机油等情况。1、药品:防高反药、氧气筒,一些退烧药、感冒药、葡萄糖、碘伏等药品。2、衣服:冬季羽绒服、保暖裤、防风外套、短袖T恤额、长袖秋衣、牛仔裤、运动鞋2双。3、棉絮、厚被子、雨伞、遮阳帽、防嗮袖。4、方便面、矿泉水、水果、零食、红牛、八宝粥。5、工具:水果刀、湿巾纸、干纸巾、透明胶、剪刀、灭火器、帐篷、超大保温杯。上面有些东西不是必须的,只是防止为了突发情况时使用,比如半夜在高速堵车、或者高速上车外了,或者车着火了等极端情况。人员:计划自己和老爸2人自驾的,因为妈身体不太好,也不想去那么远的地方,老婆要带儿子回娘家玩,由于担心开车太累或者出现紧急情况所以叫上了亲姐,结果侄儿也要去,所以一路上4个人,能开车的就我和姐。线路规划:计划路线:成都环球上高速->京昆高速->雅叶高速->康定实际路线:成都环球上高速->京昆高速->雅叶高速->泸定县本来计划先到达康定住一晚,第二天开始游玩。但是用于第3天中午吃了午饭才从成都出发,6个小时才能到达康,预估到不了康定,所以第一天先到泸定县住了一晚,晚上逛了一下泸定县,至此第一天就结束了,第一天影响比较深的就是下高速后进泸定县的路比较陡,城市很难见到,然后就是所谓的勇士路,很堵,停车场爆满,直接开发泸定县城附近在找到合适停车地方。第二天一大早,到泸定县吃了早餐,逛了泸定桥、大渡河、泸定纪念公园就直接出发康定红海子,期间途径康定县城堵车严重,之后翻过折多山(堵得要命)。在上折多山途中停车弄了一碗泡面当作午餐、吃了一些水果。然后一路拍照,之后逛了红海子、斯丁措、鱼子西、新都桥,经过康定机场。空气、天气很好,蓝天白云、就是太堵了。第二天时间比较紧,加上姐高反比较严重,所以一直催着到低海拔的新都桥镇去休息。我和老爸高反还不是特别严重。上面几个地方拍照完后,下午直接奔新都桥,也是一路堵,下午半天差不多就一直堵在车上,就这样第二天就匆匆忙忙的完了。晚上到达新都桥找好住宿后,休息一会在新都桥镇上吃了晚上,就早早的休息了。第三天吃完早饭,一早去了新都桥,结果和想象的景色不太一样,拍了一些照片。然后看到附近的贡嘎山观景台,去爬了一会实在爬不动,加上还要开车就爬了一点点。接着买了一些牛肉120元/每斤。接着就往回走了,本来计划是还要到塔公草原、墨石公园玩的,但是姐高反加姐只有3天假期所以就放弃了。下午返回途径318国道,回途中印象最深的就是回来的318国道开车比较有意思,陡峭、弯急,回途经过折多山也是堵的要命。去和回的高速上基本不堵车,车速保持在110~125左右,开车印象最深的就是二郎山附近的几个隧道全长20公里左右,去基本是上坡,回的时候基本保持80码的速度,全是下坡,基本不怎么耗油。3天全是我一个人开,膝盖都酸了,翻越折多山时叫姐开,她不敢开,最后还是自己来,3天全部行车700公里左右。来途径成都浦江服务区、雅安天全服务区、泸定服务区,回去途中在雅安天全服务区、浦江服务区休息了一会。回家途中天全服务区侄儿开门不小心将旁边的马自达车门碰了一个小吭,陪了200元。幸好是个马子达,就当吸取教训吧。晚上达到姐家,爸和姐去超市买菜炒了一份回锅肉、买了一瓶大可乐,吃完饭,去了附近姐经常自助洗车的洗车店4个人一起把车洗了,晚上开车回家。感受:3天时间比较紧,加上高反,各景点没有好好玩,各个地方的乡镇没有好好逛逛、好吃的也没怎么吃到。感觉像是去拍了照就走了,没什么留下也没带走什么,老爸、老姐一直在喊太累,可能是晚上没修改好。最大的好处就是开车技术应该有了一定提升。在姐高反严重,都要打120时,感受最深的就是,身体健康才是本钱,回去还是要坚持运动,保持一项个人喜欢的运动,保持好的生活习惯。晚上急急忙忙的记录了一下,就到这吧,儿子媳妇都睡了,我也想睡了。
-
近况 近况其实一直想写一些关于生活方面的文章,但是由于担心隐私泄露以及文笔不好,表达能力不好,就搁置了。最近突然觉得还是应该记录一些生活,有时有很多想写的,但是组织语言又不好,估计只能写一小段,就不好意思写了。先分享一首刚刚听见的歌曲,感觉此刻听着还不错。《要山要海要自由》{music id="2042878838" color="#1989fa" autoplay="autoplay"/}要孩子一样的笑容要风晕开岁月褶皱要山要海要自由要大雨磅礴扑向我要清澈透明的天空要一口解忧的烈酒.....今晚带儿子游泳,回家已经9点了,感觉时间比较晚了,因为回来还要刷牙喝奶,然后才上传睡觉,但是媳妇还是要给儿子复习一下在培训机构学习的英语课程,不然估计下周又忘了。最近一直没怎么学习技术方面的东西,一是下班回家后不想动,二是最近想运动一下,原因是感觉有白头发了,加上以前一直晚睡,养成了不好的习惯。今晚媳妇和儿子睡了,才有自己时间听听歌,看看新闻,才静下心来写这篇文章。也不知道写些什么,就说一下这种关于运动的事情吧。周一下班骑自行车回家,从公司到小区门口6.05公里,用时23分钟,平均速度15.52km/h.周二晚上19:30吃了晚饭,带着儿子去游泳馆游到20:30回家,接着玩了会手机23:15睡觉。周三今晚19:10出发去游泳馆,20:20冲洗骑车回家,到家21:00,接口给儿子冲奶,儿子喝完奶媳妇帮儿子刷牙。21:20媳妇在床上给儿子复习英语,然后每晚必备的睡前故事。大概21:40睡觉,感觉时间还是比较晚了。明天周四不去了,一是时间有点紧,二是刚上一年级,才开学几天,还是要以学校学习为主。计划明晚让儿子早点睡,老师提倡的是20:30准备睡觉。附上几张儿子开学的照片记念一下儿子开学当天。感觉上面写的都是一些口水话,自认为没有任何文笔,记得初中时语文,英文差的不是一点点。今晚就写到这吧,不管有没有人看,就当个人垃圾桶吧。本来想放几张儿子一年级开学照片,但是水果机的.HEIC格式图片windows居然不能打开,那就先搞个解码器,等可以预览了在放吧。找到一张大运会期间的照片。
-
Kafka内外网隔离配置及安装使用 环境版本说明环境:CentOS7版本:JDK1.8、Zookeeper-3.4.14、Kafka2.12-1.0.2JDK安装JDK1.8安装rpm -ivh jdk-8u261-linux-x64.rpm环境变量配置vim /etc/profile最后一行加上配置export JAVA_HOME=/usr/java/jdk1.8.0_261-amd64 export PATH=$PATH:$JAVA_HOME/binjdk验证java -versionZookeeper安装安装tar -zxf zookeeper-3.4.14.tar.gz -C /opt环境变量配置vim /etc/profileZOOKEEPER_PREFIX指向Zookeeper的解压目录export ZOOKEEPER_PREFIX=/opt/zookeeper-3.4.14将Zookeeper的bin目录添加到PATH中export PATH=$PATH:$ZOOKEEPER_PREFIX/bin设置环境变量ZOO_LOG_DIR,指定Zookeeper保存日志的位置export ZOO_LOG_DIR=/var/zookeeper/log使配置生效source /etc/profile修改zookeeper配置cd conf cp zoo_sample.cfg zoo.cfg修改配置文件zoo.cfgvi zoo.cfg修改zookeeper数据存放位置配置修改前dataDir=/tmp/zookeeper修改后dataDir=/var/zookeeper/data启动zookeeper进入zookeeper安装目录=/var/zookeeper/bin启动zookeeperzkServer.sh start查看zookeeper状态zkServer.sh statusKafka安装安装kafkatar -zxf kafka_2.12-1.0.2.tgz -C /opt修改环境变量vi /etc/profile最后加上配置export KAFKA_HOME=/opt/kafka_2.12-1.0.2 export PATH=$PATH:$KAFKA_HOME/bin使配置生效source /etc/profile修改kafka配置修改server.properties配置文件vi server.properties修改链接zookeeper地址:123行修改前zookeeper.connect=localhost:2181修改后zookeeper.connect=localhost:2181/mykafka说明:表示在zookeeper目录下会创建一个mykafka节点修改消息持久化目录:60行修改前log.dirs=/tmp/kafka-logs修改后log.dirs=/var/kafka/kafka-logs创建持久化目录文件夹mkdir -p /var/kafka/kafka-logs脚本说明cd /opt/kafka_2.12-1.0.2/bin说明:kafka-topics.sh 操作主题的 kafka-server-start.sh kafka启动 kafka-server-stop.sh kafka关闭 kafka-console-consumer.sh 命令行里使用消费者 kafka-console-producer.sh 命令行里面使用的生产者启动kafka注意是进入到bin目录下的kafka-server-start.sh ../config/server.properties客户端测试使用zookeeper客户端登录zookeeper,复制启动窗口执行zkCli.sh。(注意:必须复制服务器启动窗口来执行,不然没有脚本。)zkCli.sh查看zookeeper的根节点ls /查看mykafkals /mykafka说明:cluster 集群 controller 控制器 controller_epoch 控制器纪元数据 brokers broker admin 管理者 isr_change_notification 同步的副本 consumers 消费者 log_dir_event_notification log_dir事件通知 latest_producer_id_block 最后一个生产者 config 配置客户端退出zookeeperquit关闭kafkakafka-server-stop.sh主题后台启动kafkakafka-server-start.sh -daemon /opt/kafka_2.12-1.0.2/config/server.properties查看kafka进程信息ps aux | grep kafka主题脚本使用帮助,直接执行脚本,显示主题脚本使用参数。kafka-topics.sh使用参数如下:[root@default-dev bin]# kafka-topics.sh Create, delete, describe, or change a topic. Option Description ------ ----------- --alter Alter the number of partitions, replica assignment, and/or configuration for the topic. --config <String: name=value> A topic configuration override for the topic being created or altered.The following is a list of valid configurations: cleanup.policy compression.type delete.retention.ms file.delete.delay.ms flush.messages flush.ms follower.replication.throttled. replicas index.interval.bytes leader.replication.throttled.replicas max.message.bytes message.format.version message.timestamp.difference.max.ms message.timestamp.type min.cleanable.dirty.ratio min.compaction.lag.ms min.insync.replicas preallocate retention.bytes retention.ms segment.bytes segment.index.bytes segment.jitter.ms segment.ms unclean.leader.election.enable See the Kafka documentation for full details on the topic configs. --create Create a new topic. --delete Delete a topic --delete-config <String: name> A topic configuration override to be removed for an existing topic (see the list of configurations under the --config option). --describe List details for the given topics. --disable-rack-aware Disable rack aware replica assignment --force Suppress console prompts --help Print usage information. --if-exists if set when altering or deleting topics, the action will only execute if the topic exists --if-not-exists if set when creating topics, the action will only execute if the topic does not already exist --list List all available topics. --partitions <Integer: # of partitions> The number of partitions for the topic being created or altered (WARNING: If partitions are increased for a topic that has a key, the partition logic or ordering of the messages will be affected --replica-assignment <String: A list of manual partition-to-broker broker_id_for_part1_replica1 : assignments for the topic being broker_id_for_part1_replica2 , created or altered. broker_id_for_part2_replica1 : broker_id_for_part2_replica2 , ...> --replication-factor <Integer: The replication factor for each replication factor> partition in the topic being created. --topic <String: topic> The topic to be create, alter or describe. Can also accept a regular expression except for --create option --topics-with-overrides if set when describing topics, only show topics that have overridden configs --unavailable-partitions if set when describing topics, only show partitions whose leader is not available --under-replicated-partitions if set when describing topics, only show under replicated partitions --zookeeper <String: urls> REQUIRED: The connection string for the zookeeper connection in the form host:port. Multiple URLS can be given to allow fail-over. 注意:REQUIRED为必选参数,如上面的--zookeeper链接地址。查看所有可用主题kafka-topics.sh --zookeeper localhost:2181/mykafka --list创建主题kafka-topics.sh --zookeeper localhost/mykafka --create --topic topic_1 --partitions 1 --replication-factor 1说明:zookeeper端口可省略,使用的是默认的。--topic: 创建主题名字--partitions:创建几个分区,便于横向扩展。--replication-factor:一个分区创建几个副本,高可用。注意:当只有一个服务一个broker时,是没有意义的,当服务宕机了,数据也没了。因此--replication-factor副本必须在不同的kafka服务器上,才能实现高可用。再次查看可用主题kafka-topics.sh --zookeeper localhost:2181/mykafka --list查看主题详细信息kafka-topics.sh --zookeeper localhost/mykafka --describe --topic topic_1说明:topic_1有一个0号分区,在0号服务器上。实例创建一个topc_2主题,5个分区,每个分区1个副本.kafka-topics.sh --zookeeper localhost/mykafka --create --topic topic_2 --partitions 5 --replication-factor 1查看可用主题kafka-topics.sh --zookeeper localhost:2181/mykafka --list查看topic_2主题详情kafka-topics.sh --zookeeper localhost/mykafka --describe --topic topic_2说明:5个分区都在0号服务器上。消费消费脚本使用帮助:kafka-console-consumer.sh使用参数:The console consumer is a tool that reads data from Kafka and outputs it to standard output. Option Description ------ ----------- --blacklist <String: blacklist> Blacklist of topics to exclude from consumption. --bootstrap-server <String: server to REQUIRED (unless old consumer is connect to> used): The server to connect to. --consumer-property <String: A mechanism to pass user-defined consumer_prop> properties in the form key=value to the consumer. --consumer.config <String: config file> Consumer config properties file. Note that [consumer-property] takes precedence over this config. --csv-reporter-enabled If set, the CSV metrics reporter will be enabled --delete-consumer-offsets If specified, the consumer path in zookeeper is deleted when starting up --enable-systest-events Log lifecycle events of the consumer in addition to logging consumed messages. (This is specific for system tests.) --formatter <String: class> The name of a class to use for formatting kafka messages for display. (default: kafka.tools. DefaultMessageFormatter) --from-beginning If the consumer does not already have an established offset to consume from, start with the earliest message present in the log rather than the latest message. --group <String: consumer group id> The consumer group id of the consumer. --isolation-level <String> Set to read_committed in order to filter out transactional messages which are not committed. Set to read_uncommittedto read all messages. (default: read_uncommitted) --key-deserializer <String: deserializer for key> --max-messages <Integer: num_messages> The maximum number of messages to consume before exiting. If not set, consumption is continual. --metrics-dir <String: metrics If csv-reporter-enable is set, and directory> this parameter isset, the csv metrics will be output here --new-consumer Use the new consumer implementation. This is the default, so this option is deprecated and will be removed in a future release. --offset <String: consume offset> The offset id to consume from (a non- negative number), or 'earliest' which means from beginning, or 'latest' which means from end (default: latest) --partition <Integer: partition> The partition to consume from. Consumption starts from the end of the partition unless '--offset' is specified. --property <String: prop> The properties to initialize the message formatter. --skip-message-on-error If there is an error when processing a message, skip it instead of halt. --timeout-ms <Integer: timeout_ms> If specified, exit if no message is available for consumption for the specified interval. --topic <String: topic> The topic id to consume on. --value-deserializer <String: deserializer for values> --whitelist <String: whitelist> Whitelist of topics to include for consumption. --zookeeper <String: urls> REQUIRED (only when using old consumer): The connection string for the zookeeper connection in the form host:port. Multiple URLS can be given to allow fail-over. REQUIRED:必填参数unless old consumer is used:使用老消费者--bootstrap-server <String: server to REQUIRED (unless old consumer is connect to> used): The server to connect to. only when using old consumer:使用旧消费时使用--zookeeper <String: urls> REQUIRED (only when using old consumer): The connection string for the zookeeper connection in the form host:port. Multiple URLS can be given to allow fail-over.消费者消费链接Kafka服务端,当有多台Kafka时,只需要链接其中一台服务即可。注意,消费者消费端口是9092了。kafka-console-consumer.sh --bootstrap-server localhost:9092 --topic topic_1说明:--bootstrap-server localhost:9092:指定kafka服务地址端口--topic topic_1:指定消费的主题测试界面像是卡住了,不管。消费者API使用参数配置说明生产生产脚本使用帮助kafka-console-producer.sh使用参数:Read data from standard input and publish it to Kafka. Option Description ------ ----------- --batch-size <Integer: size> Number of messages to send in a single batch if they are not being sent synchronously. (default: 200) --broker-list <String: broker-list> REQUIRED: The broker list string in the form HOST1:PORT1,HOST2:PORT2. --compression-codec [String: The compression codec: either 'none', compression-codec] 'gzip', 'snappy', or 'lz4'.If specified without value, then it defaults to 'gzip' --key-serializer <String: The class name of the message encoder encoder_class> implementation to use for serializing keys. (default: kafka. serializer.DefaultEncoder) --line-reader <String: reader_class> The class name of the class to use for reading lines from standard in. By default each line is read as a separate message. (default: kafka. tools. ConsoleProducer$LineMessageReader) --max-block-ms <Long: max block on The max time that the producer will send> block for during a send request (default: 60000) --max-memory-bytes <Long: total memory The total memory used by the producer in bytes> to buffer records waiting to be sent to the server. (default: 33554432) --max-partition-memory-bytes <Long: The buffer size allocated for a memory in bytes per partition> partition. When records are received which are smaller than this size the producer will attempt to optimistically group them together until this size is reached. (default: 16384) --message-send-max-retries <Integer> Brokers can fail receiving the message for multiple reasons, and being unavailable transiently is just one of them. This property specifies the number of retires before the producer give up and drop this message. (default: 3) --metadata-expiry-ms <Long: metadata The period of time in milliseconds expiration interval> after which we force a refresh of metadata even if we haven't seen any leadership changes. (default: 300000) --old-producer Use the old producer implementation. --producer-property <String: A mechanism to pass user-defined producer_prop> properties in the form key=value to the producer. --producer.config <String: config file> Producer config properties file. Note that [producer-property] takes precedence over this config. --property <String: prop> A mechanism to pass user-defined properties in the form key=value to the message reader. This allows custom configuration for a user- defined message reader. --queue-enqueuetimeout-ms <Integer: Timeout for event enqueue (default: queue enqueuetimeout ms> 2147483647) --queue-size <Integer: queue_size> If set and the producer is running in asynchronous mode, this gives the maximum amount of messages will queue awaiting sufficient batch size. (default: 10000) --request-required-acks <String: The required acks of the producer request required acks> requests (default: 1) --request-timeout-ms <Integer: request The ack timeout of the producer timeout ms> requests. Value must be non-negative and non-zero (default: 1500) --retry-backoff-ms <Integer> Before each retry, the producer refreshes the metadata of relevant topics. Since leader election takes a bit of time, this property specifies the amount of time that the producer waits before refreshing the metadata. (default: 100) --socket-buffer-size <Integer: size> The size of the tcp RECV size. (default: 102400) --sync If set message send requests to the brokers are synchronously, one at a time as they arrive. --timeout <Integer: timeout_ms> If set and the producer is running in asynchronous mode, this gives the maximum amount of time a message will queue awaiting sufficient batch size. The value is given in ms. (default: 1000) --topic <String: topic> REQUIRED: The topic id to produce messages to. --value-serializer <String: The class name of the message encoder encoder_class> implementation to use for serializing values. (default: kafka. serializer.DefaultEncoder) 注意:REQUIRED必填参数生产者链接kafka服务kafka-console-producer.sh --broker-list localhost:9092 --topic topic_1说明:--broker-list:指定broker,如果有很多太kafka服务器,只需要指定2个地址接口,这里只有一台kafka服务器,只指定一个。--topic:指定要发送消息到那个topic主题。此时生产者窗口也像卡住了,说明进入了发送消息界面。生产者API使用参数配置说明消息发送接收测试注意:提示如下信息检查主题名称是否错误WARN [Producer clientId=console-producer] Error while fetching metadata with correlation id 8可查看可用主题:明确消费主题和生产者是否是使用的一个主题。kafka-topics.sh --zookeeper localhost:2181/mykafka --list消息的发送与接受测试结果:注意:当关闭消费者后,生产者继续发送消息,当生产者重新链接后,只能接受到后面生产者重新发送的消息。消费历史消息如果要消费以前的消息可以指定参数--from-beginningkafka-console-consumer.sh --bootstrap-server localhost:9092 --topic topic_1 --from-beginning查看持久化数据ca /var/kafka/kafka-logs可以看到很多偏移量的文件。服务端参数配置主要是服务器kafka配置文件server.properties的配置zookeeper.connect该参数用于配置kafka要链接的Zookeeper/集群地址。它的值是一个字符串,使用都好分割zookeeper的多个地址。Zookeeper的单个地址是host:port形式的,可以在最后添加kafka在zookeeper中的根节点路径。例如: zookeeper.connect=192.1681.1:2181,192.1681.2:2181,192.1681.3:2181,192.1681.4:2181/mykafka最好服务器地址数量过半,后面zookeeper存放路径/mykafka写一个就好了。listeners用于指定当前Broker向外发布服务的地址和端口。与advertised.listeners配合,用于做内外网隔离。注意:端口号也是可以修改的。内外网隔离配置listeners用于配置broker监听的URL以及监听器名称列表,使用逗号隔开多个URL及监听器名称。例如:服务器有2个ip,ip如下则配置如下:listeners配置:注意监听器名称不能相同,端口不能相同。PLAINTEXT代表了都使用PLAINTEXT协议,也代表了监听器的名称,但是名称又不能相同,因此使用映射配置参数listner.sercurity.protocol.map。加上上面配置后,启动还是会报错,因此必须加上如下配置:整体说明:注意kafka是使用的PLAINTEXT协议listener.security.protocol.map=INTERNAL:PLAINTEXT,EXTERNAL:PLAINTEXT listeners=INTERNAL://10.0.2.15:9000,EXTERNAL://192.168.56.30:9001 advertised.listeners=EXTERNAL://192.168.56.30:9001 inter.broker.listener.name=EXTERNALlistener.security.protocol.map:解决监听协议、监听器名称一样问题。listeners:集群多台服务地址advertised.listeners:暴露给消费者生产者,以及节点间通讯使用的地址和端口(需要将该地址发布到zookeeper供客户端使用,如果客户端使用的地址与listeners配置不同),而另一个地址端口INTERNAL://10.0.2.15:9000则可用于内部管理kafka。inter.broker.listener.name:暴力给消费者生产者使用监听的监听器名称,如果要暴露多个直接可以逗号隔开多加几个,前提是listeners里面有的。listener.security.protocol.map用于内外网隔离配置,监听器名称和安全协议的映射配置。例如:将内外网隔离,即使他们都使用SSL,上面的配置问题就可以加下面参数解决。listener.security.protocol.map=INTERNAL:SSL,EXTERNAL:SSL说明:INTERNAL,EXTERNAL:代表监听器名称SSL:代表都是使用SSL协议。加上这个参数配置,就可以解决上面的监听器名称和协议冲突的问题了。注意:每个监听器的名称只能在map中出现一次。如果监听器名称代表的不是安全协议,必须配置listener.security.protocol.map。每个监听器必须使用不同的网络端口。查看zoopeeper信息:客户端脚本链接zookeeper:zkCli.sh查看kafka信息get /mykafka/brokers/ids/0查看可用主题:kafka-topics.sh --zookeeper localhost:2181/mykafka --listbroker.id该属性用于唯一标记一个kafka的Broker,它的值是一个任意integer值。当kafka以分布式集群部署使用时,非常重要。最好该值只跟该Broker所在的物理主机有关的,如主机名为host1.yanxizhu.com,则broker.id=1,如果主机名为192.168.56.30,则broker.id=30.log.dir通过该属性的值,指定kafka在磁盘上保存消息的日志片段的目录。它时一组用逗号分隔的本地文件系统路径。如果指定了多个路径,那么broker会根据”最少使用“原则,把同一个分区的日志片段保存到同一个路径下。broker会往拥有最少数目分区的路径新增分区,而不是往拥有最小磁盘空间的路径新增分区。
-
CentOS安装hugo CentOS安装hugo1、yum无法直接安装hugo,首先添加repo[daftaupe-hugo] name=Copr repo for hugo owned by daftaupe baseurl=https://copr-be.cloud.fedoraproject.org/results/daftaupe/hugo/epel-7-$basearch/ type=rpm-md skip_if_unavailable=True gpgcheck=1 gpgkey=https://copr-be.cloud.fedoraproject.org/results/daftaupe/hugo/pubkey.gpg repo_gpgcheck=0 enabled=12、安装hugoyum -y install hugo3、创建博客hugo new site blog